Linked Lists: Applications, Operations + Bonus List Reversal Problem!
Linked List
A linked list is a special variation of a list in which all the elements of the list are nodes. Each node in the list is linked to the next node in the list by means of a pointer. Linked lists typically come in two varieties, being singly or doubly linked. A singly linked list is a linked list where each node in the list contains a link to the next node in the list. Each node in a doubly linked list contains an extra pointer, which points to the previous node in the list. Today we will be directing our focus to singly linked lists, however all of the operations that can be performed on the singly linked list can be performed on the doubly linked list, albeit with slight modifications. Versus conventional arrays, linked lists have the advantage of not needing to be stored in a single block of contiguous memory, because the “link” found within each node points to the reference of another node. Data structures such as arrays require a contiguous block of memory in the RAM, meaning the element i and i + 1 are stored one after each other in memory. This inflexibility of arrays makes their management in memory more costly compared to linked lists, however, the linked list does come with certain disadvantages.
The main pain point being that linked lists don’t support direct indexing of elements in the arrays. While elements in the array can be accessed in constant time by providing the index of the item we which to access: myArray[i], linked lists have no such feature. Finding an element in a linked list takes at worst linear time, because the item may be situated at the end of the linked list, meaning we would have to traverse each node to find it. We’ll dive deeper into the time complexity of linked list operations later on, but for let’s look more in depth at the node data structure.
Node Data Structure
The node is the real star of the show behind linked lists, and the list couldn’t function without them. The basic node class is incredibly simply, consisting of only 10 lines of code! Take a look below:
    public class Node<T>
    {
        public Node<T> _Next;
        public T _Data;
        public Node(T data, Node<T> next=null)
        {
            _Data = data;
            _Next = next;
        }
    }
Each node has two properties, the data it contains and a pointer to the next node in the next. The constructor for our nodes takes some type of data, and a pointer to the next node, which is null by default. For this unfamiliar with generics, the “T” in “Node
Operations
Linked lists must support these three basic operations: insertion, deletion, and searching operations. Other functionality and methods can be added to increase their usefulness, but we can be certain that any linked list worth its salt will support the three basic operations above.
Insertion Insertion in a linked list typically takes constant time, but this can vary based on how we implement it. If we insert at the front or “head” of the linked list, we set the new node’s next pointer to the current head of the list, and return the new node as the head of the linked list, like so:
        public static Node<T> Insert<T>(Node<T> head, T value)
        {
            Node<T> newNode = new Node<T>(value, head);
            return newNode;
        }
The time complexity for insertions in O(1) when inserting at the head. We could also insert at the tail of the linked list, which would take linear time, unless we also maintained a pointer to the tail of the list.
Deletion Deletion in a linked list is slightly more complicated than insertion, because nodes in a singly linked list don’t contain pointers to their previous node. To delete from a singly linked list we need to find the node previous to the node wish to delete. We then set the previous node’s next pointer to the node to be deleted’s next pointer. This effectively severs the tie with the node we want to delete, while maintaining a connection to the rest of the linked list. The code for this is as follows:
        public static Node<T> Delete<T>(Node<T> head,T value)
        {
            //handle the special case where the head is the node we want to delete
            if (head._Data.Equals(value))
            {
                return head._Next;
            }
            //the current node iterates through our linked list
            Node<T> current = head;
            while(current._Next != null)
            {
                //the next node is the one we want to delete
                if(current._Next._Data.Equals(value))
                {
                    current._Next = current._Next._Next;
                    break;
                }
                else
                {
                    current = current._Next;
                }
            }
            return head;
        }
In the code above we handle the special case where the head is the node we wish to delete. If the node is not the head, then we search through the list, seeing if the next node is the one we wish to delete. The time complexity for deletions is O(n), as we may have to search n-1 nodes to find the node we want to delete.
Searching Searching in a linked can be done iteratively and also recursively, let’s take a look at the iterative solution first, and then see how we can use it to come up with a recursive solution.
        public static Node<T> IterativeSearch<T>(Node<T> head, T value)
        {
            Node<T> current = head;
            while(current != null)
            {
                if (current._Data.Equals(value))
                {
                    return current;
                }
                current = current._Next;
            }
            return current;
        }
We start by initializing a node current, which we use as an iterator to traverse our linked list. We continue along the linked list, one node at a time, until we find the node we desire. If we don’t find the node, then our while loop terminates when our current node equals null. We then return the current node, effectively returning null when the node we want to find is not in the list. It should also be noted that if the list contains duplicate values this function will return the first occurrence of the value in the list. To come up with the recursive implementation, let’s take a second to think about what we are actually doing. We are simply looking at the head of the linked list, checking if it contains the value we want, if it does, we return it, else we look at the next node in the list. Also note, that each node in the linked list is itself a linked list that begins at that node, if you’ve read my post on binary trees you will notice that this feels very familiar. In fact, the search function is very similar to that of the search function we used in the post on binary trees, except for the part where we decide to traverse the left or right sub tree. We will start at the end of the linked list, compare its value to the target value, and recurse down the linked list if necessary, returning the value up the stack if we find it (or null if not).
        public static Node<T> RecursiveSearch<T>(Node<T> head, T value)
        {
            //if we reach the end of the linked list or we find the node containing the value
            if(head == null || head._Data.Equals(value))
            {
                return head;
            }
            //if we don't find the value in the current node, recurse down the linked list until we do
            else
            {
                return RecursiveSearch(head._Next, value);
            }
        }
You may have noticed that we use .Equals() to check for equality in the methods, this is because we cannot use the default equality operator “==” on generic types. Keep this in mind if you decide to use the linked list with a custom data type, as you will have to implement the Equals() method before you can check for equality between custom objects.
Linked List Reversal
Now that we know the basics of linked lists I’d like to tackle an interesting problem with you the reader. We are going to look at problem 206 on leetcode, which tasks us with reversing a linked list. Reversing means to flip all pointers of our list, so each node now points to its previous node instead, for example: 1->2->3->4 becomes 4->3->2->1. Let’s go to our whiteboard to see an illustration of what we’d like to do:
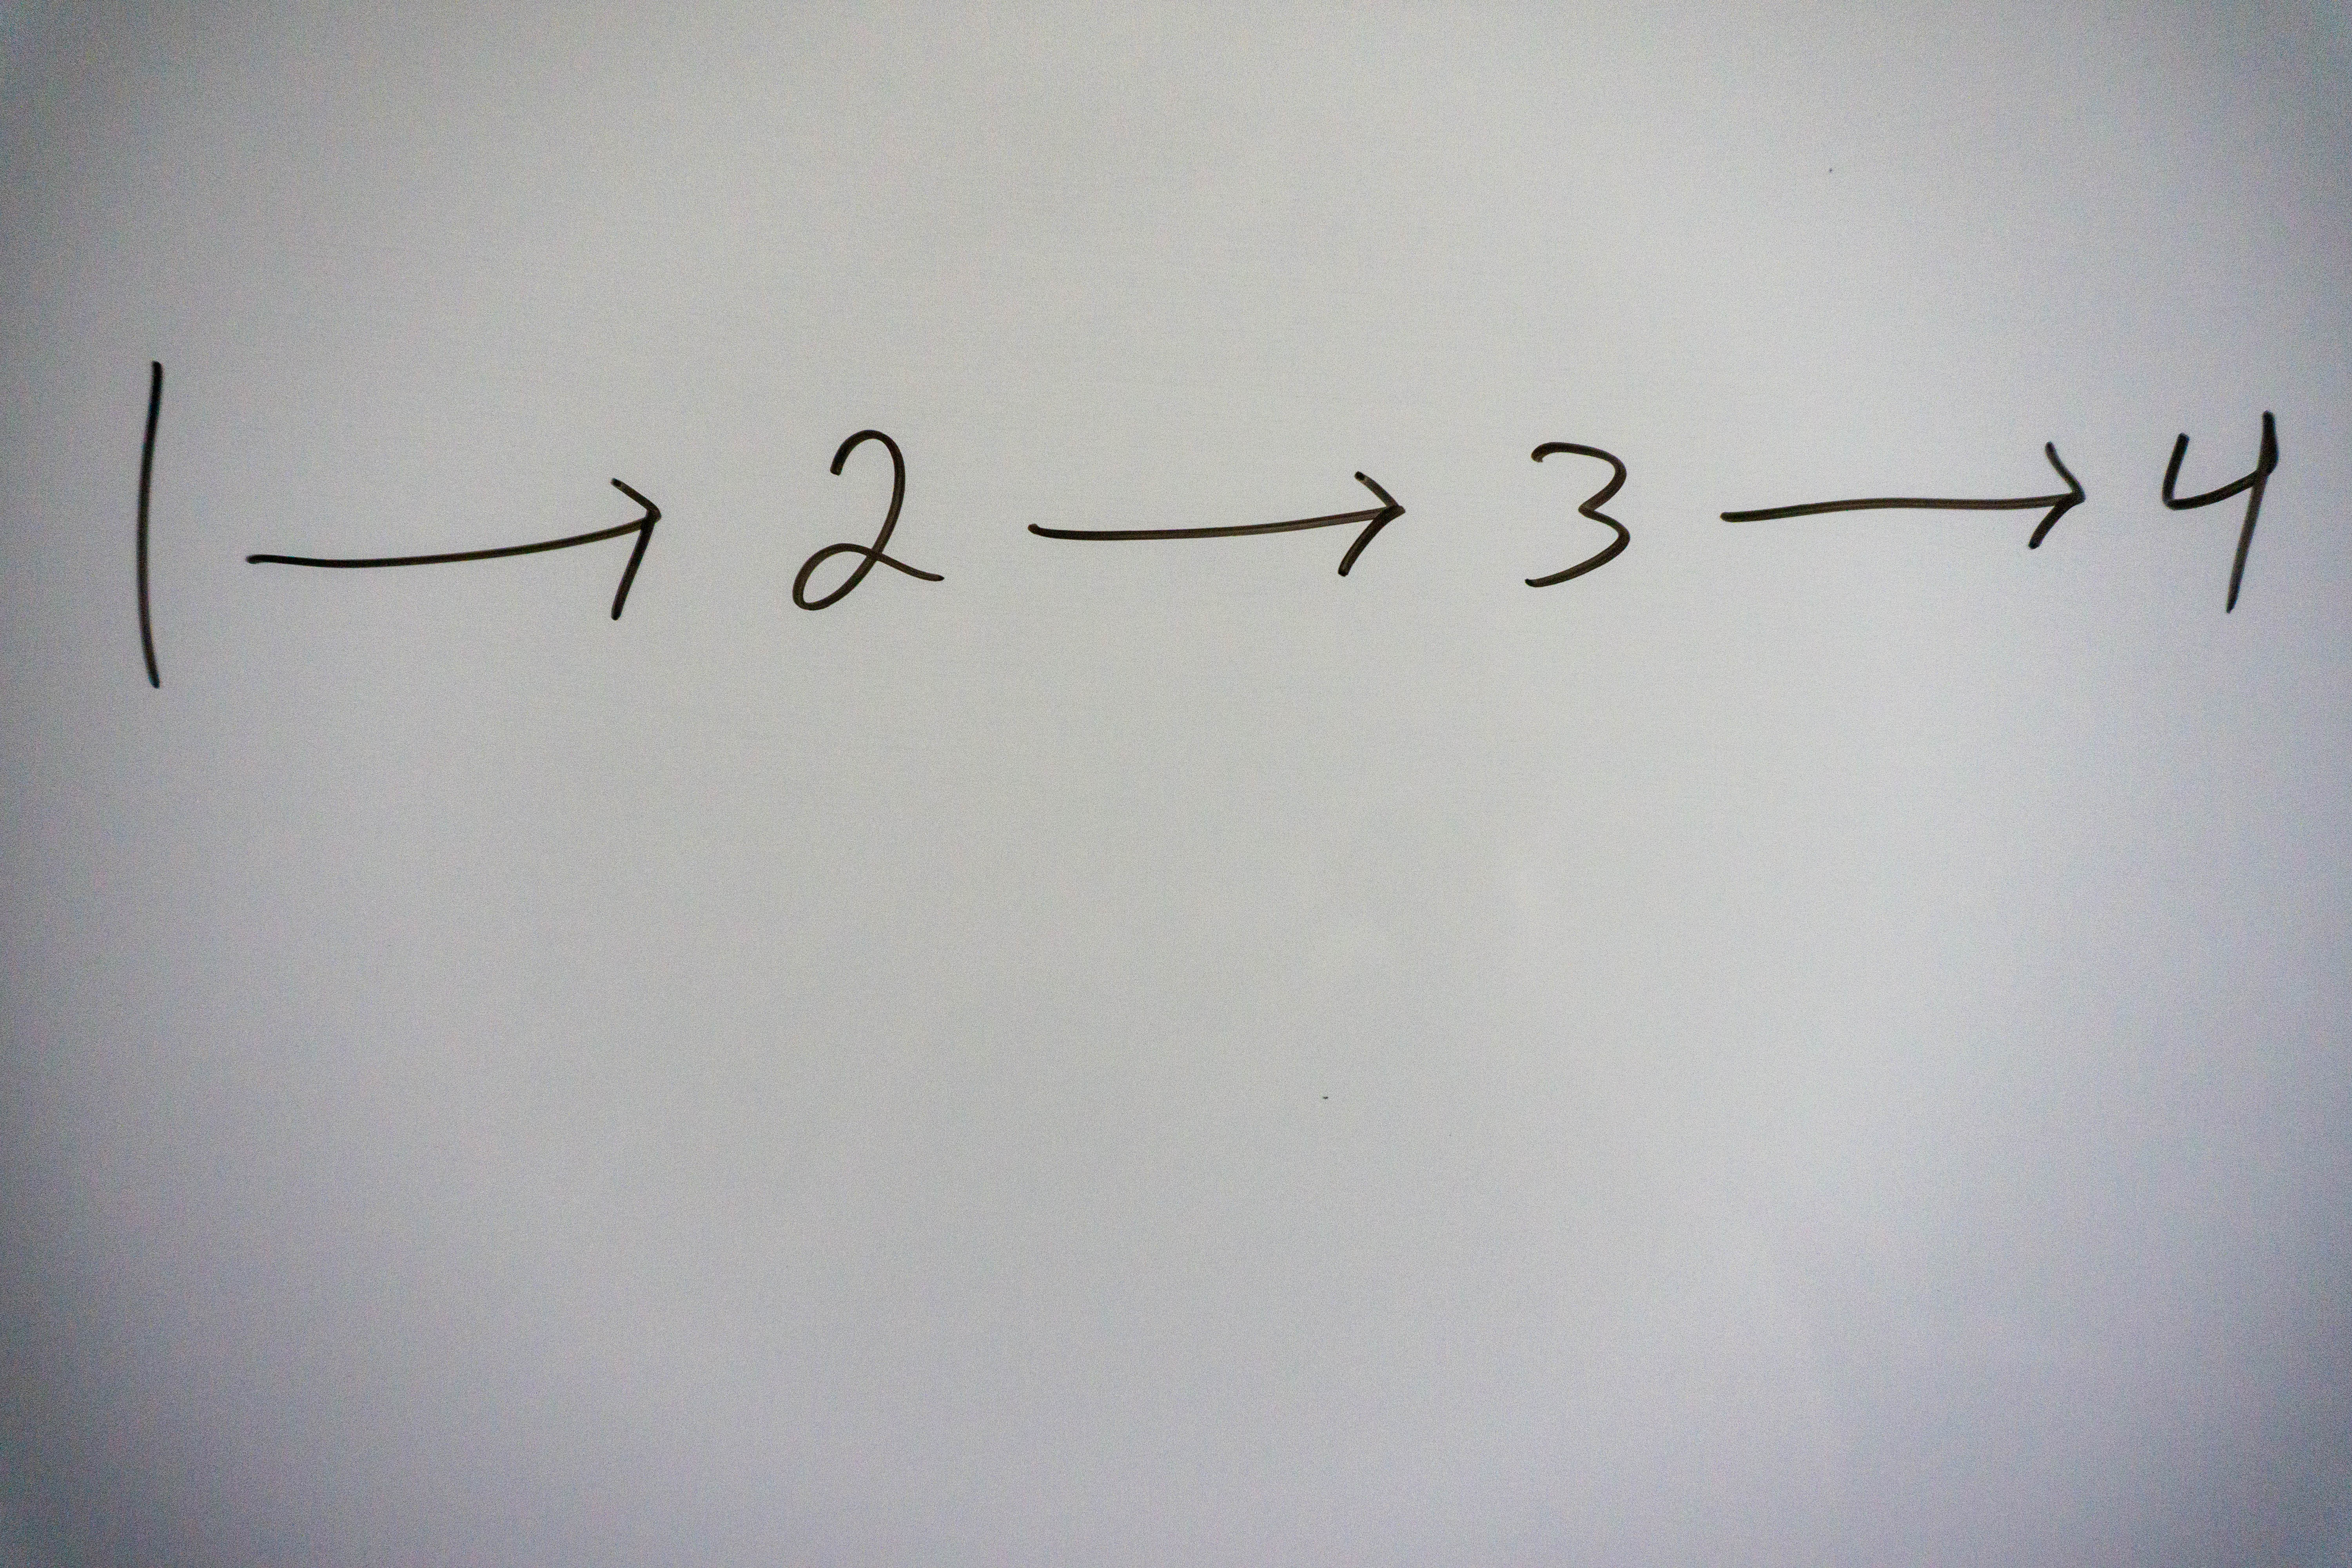 Our linked list in its current state
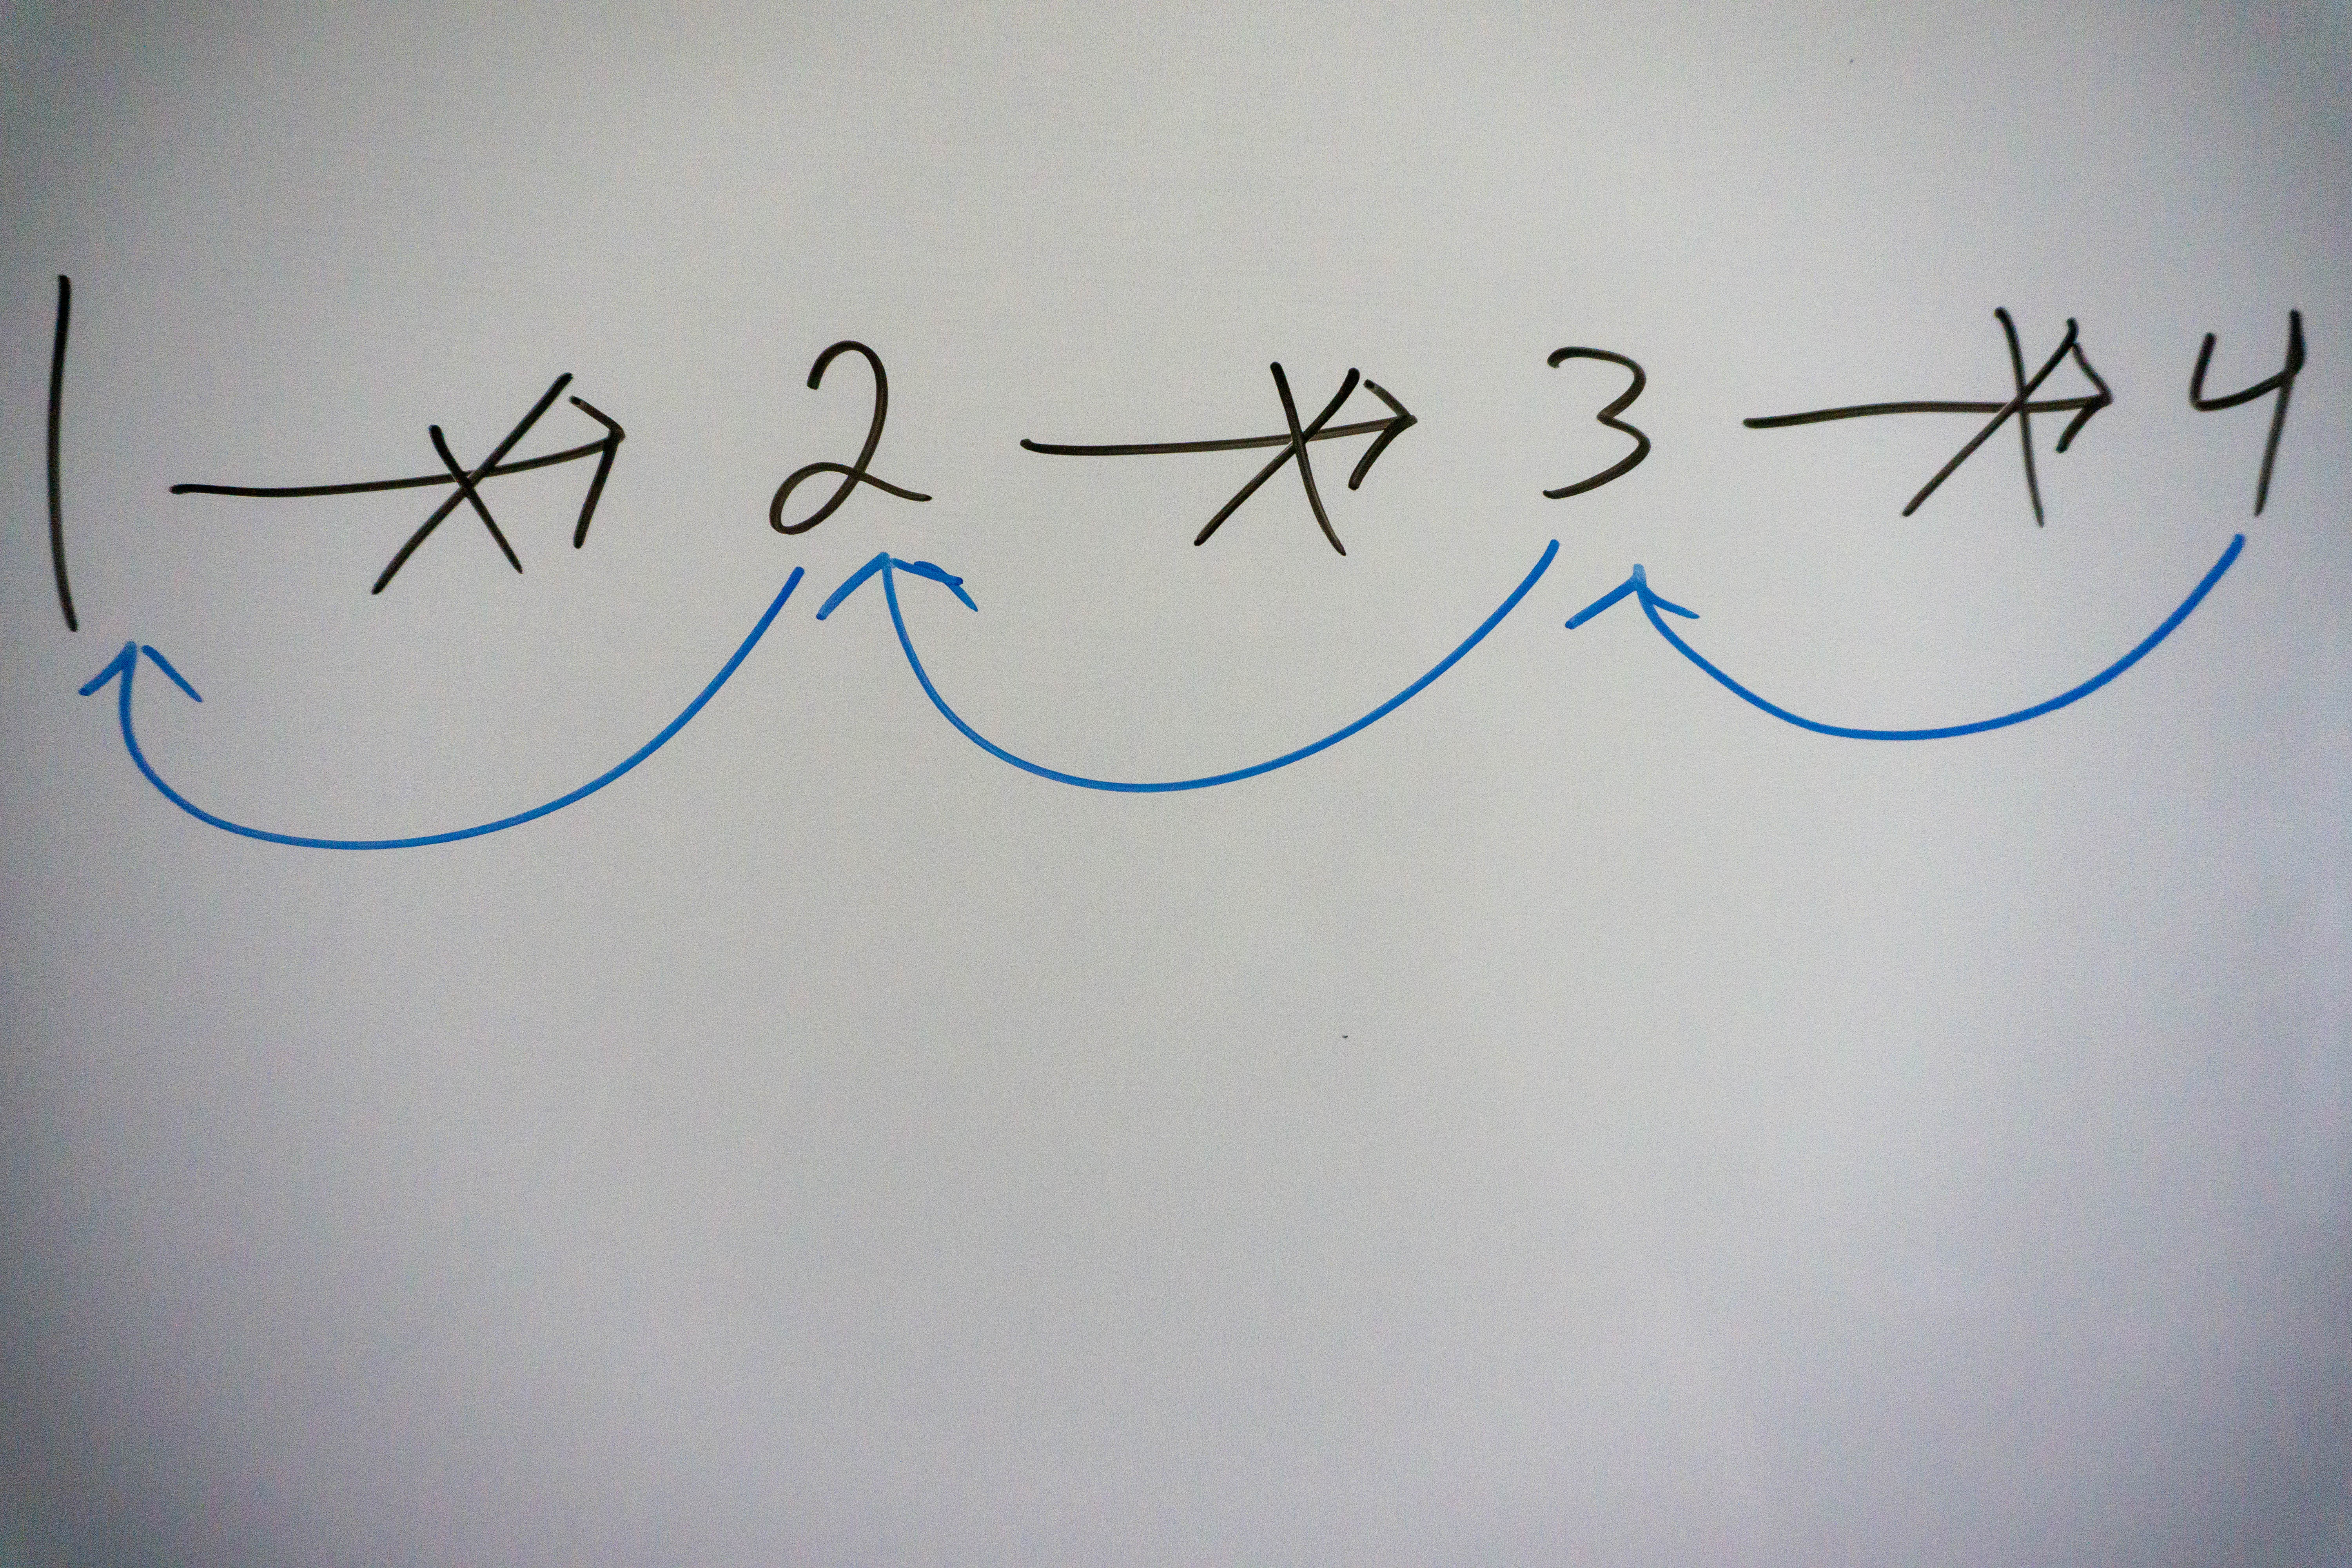 The linked list we’d like to end up with
Iterative
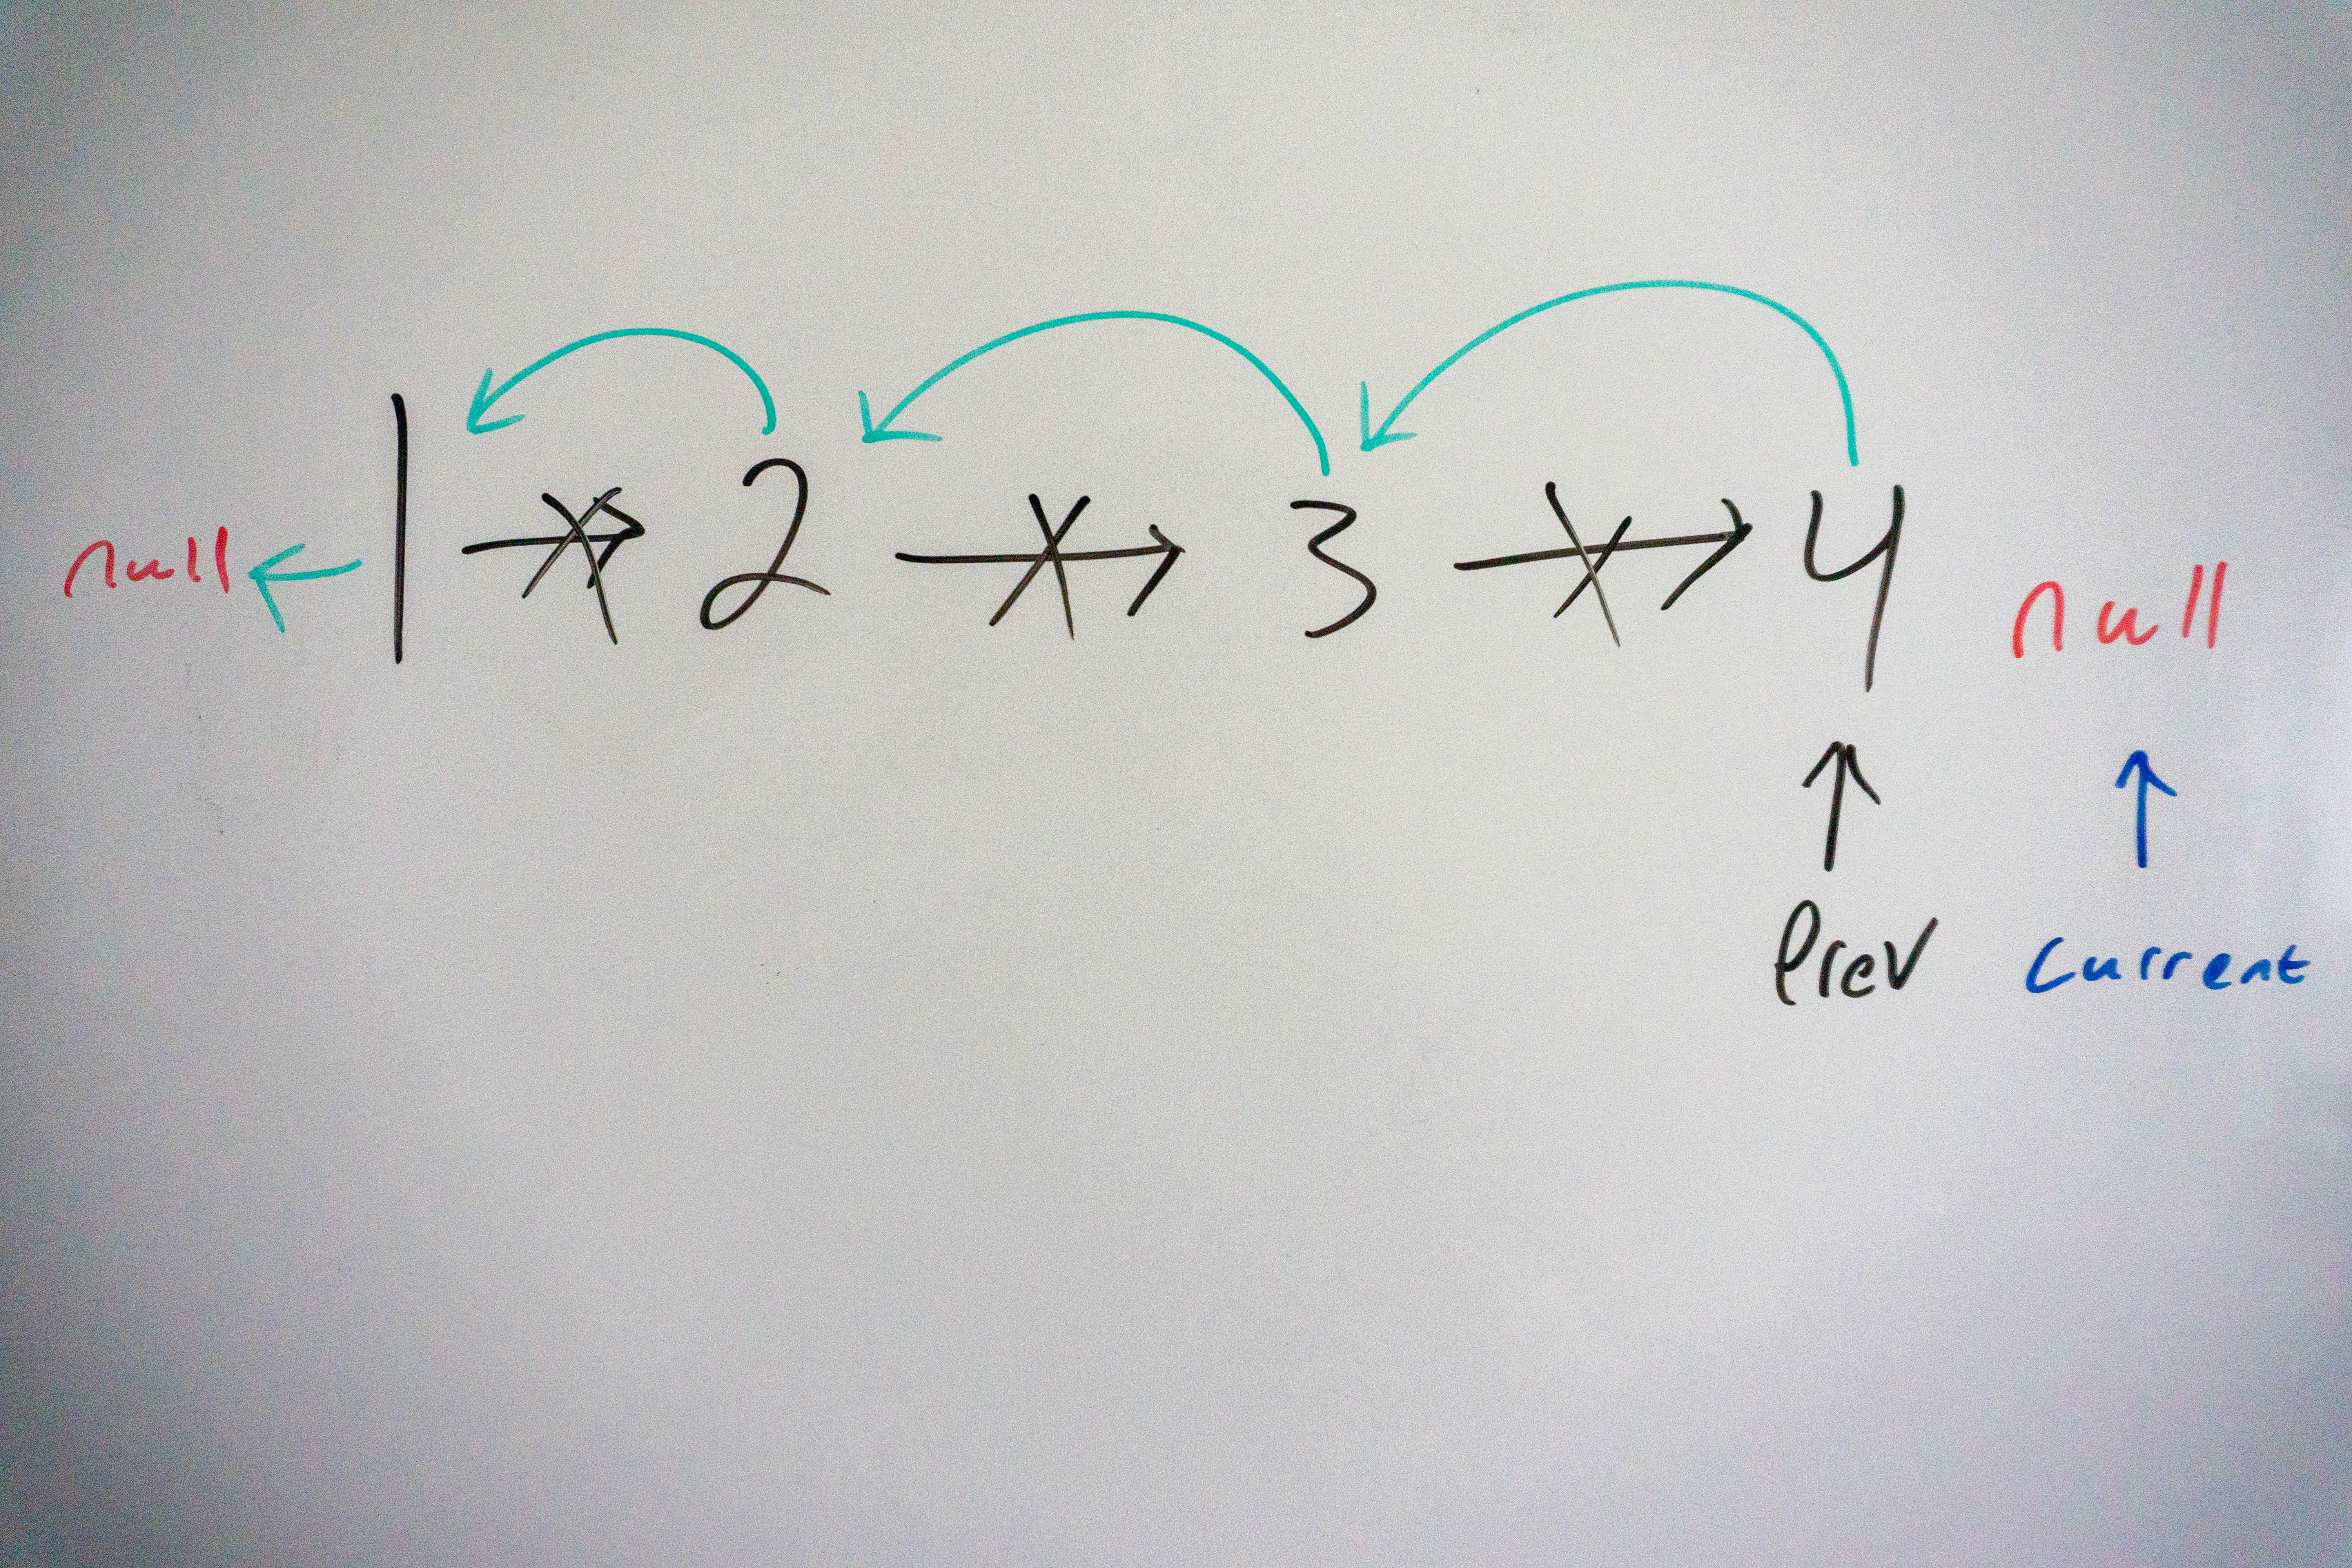
We know we will have to take the next pointer of our current node, set it to null, and set the next node’s next pointer to myself. The problem arises after that, how do we go on to reverse the next node? We can’t just simply go to the next node because we already to set the next node to null. The way we get around this problem is by storing a reference to the previous node we saw. We traverse the list, storing the current node’s next pointer in a temporary variable. We then set the current node’s next pointer to the previous node, then update the previous node to be the current node. We then set the current node to the temporary variable we created, moving forward along the list by one each time, below is the code with pictures to help you visualize the process:
    public ListNode ReverseList(ListNode head) {
        ListNode prev = null;
        ListNode current = head;
        while(current != null){
            ListNode temp = current.next;
            current.next = prev;
            prev = current;
            current = temp;
        }
        return prev;
    }
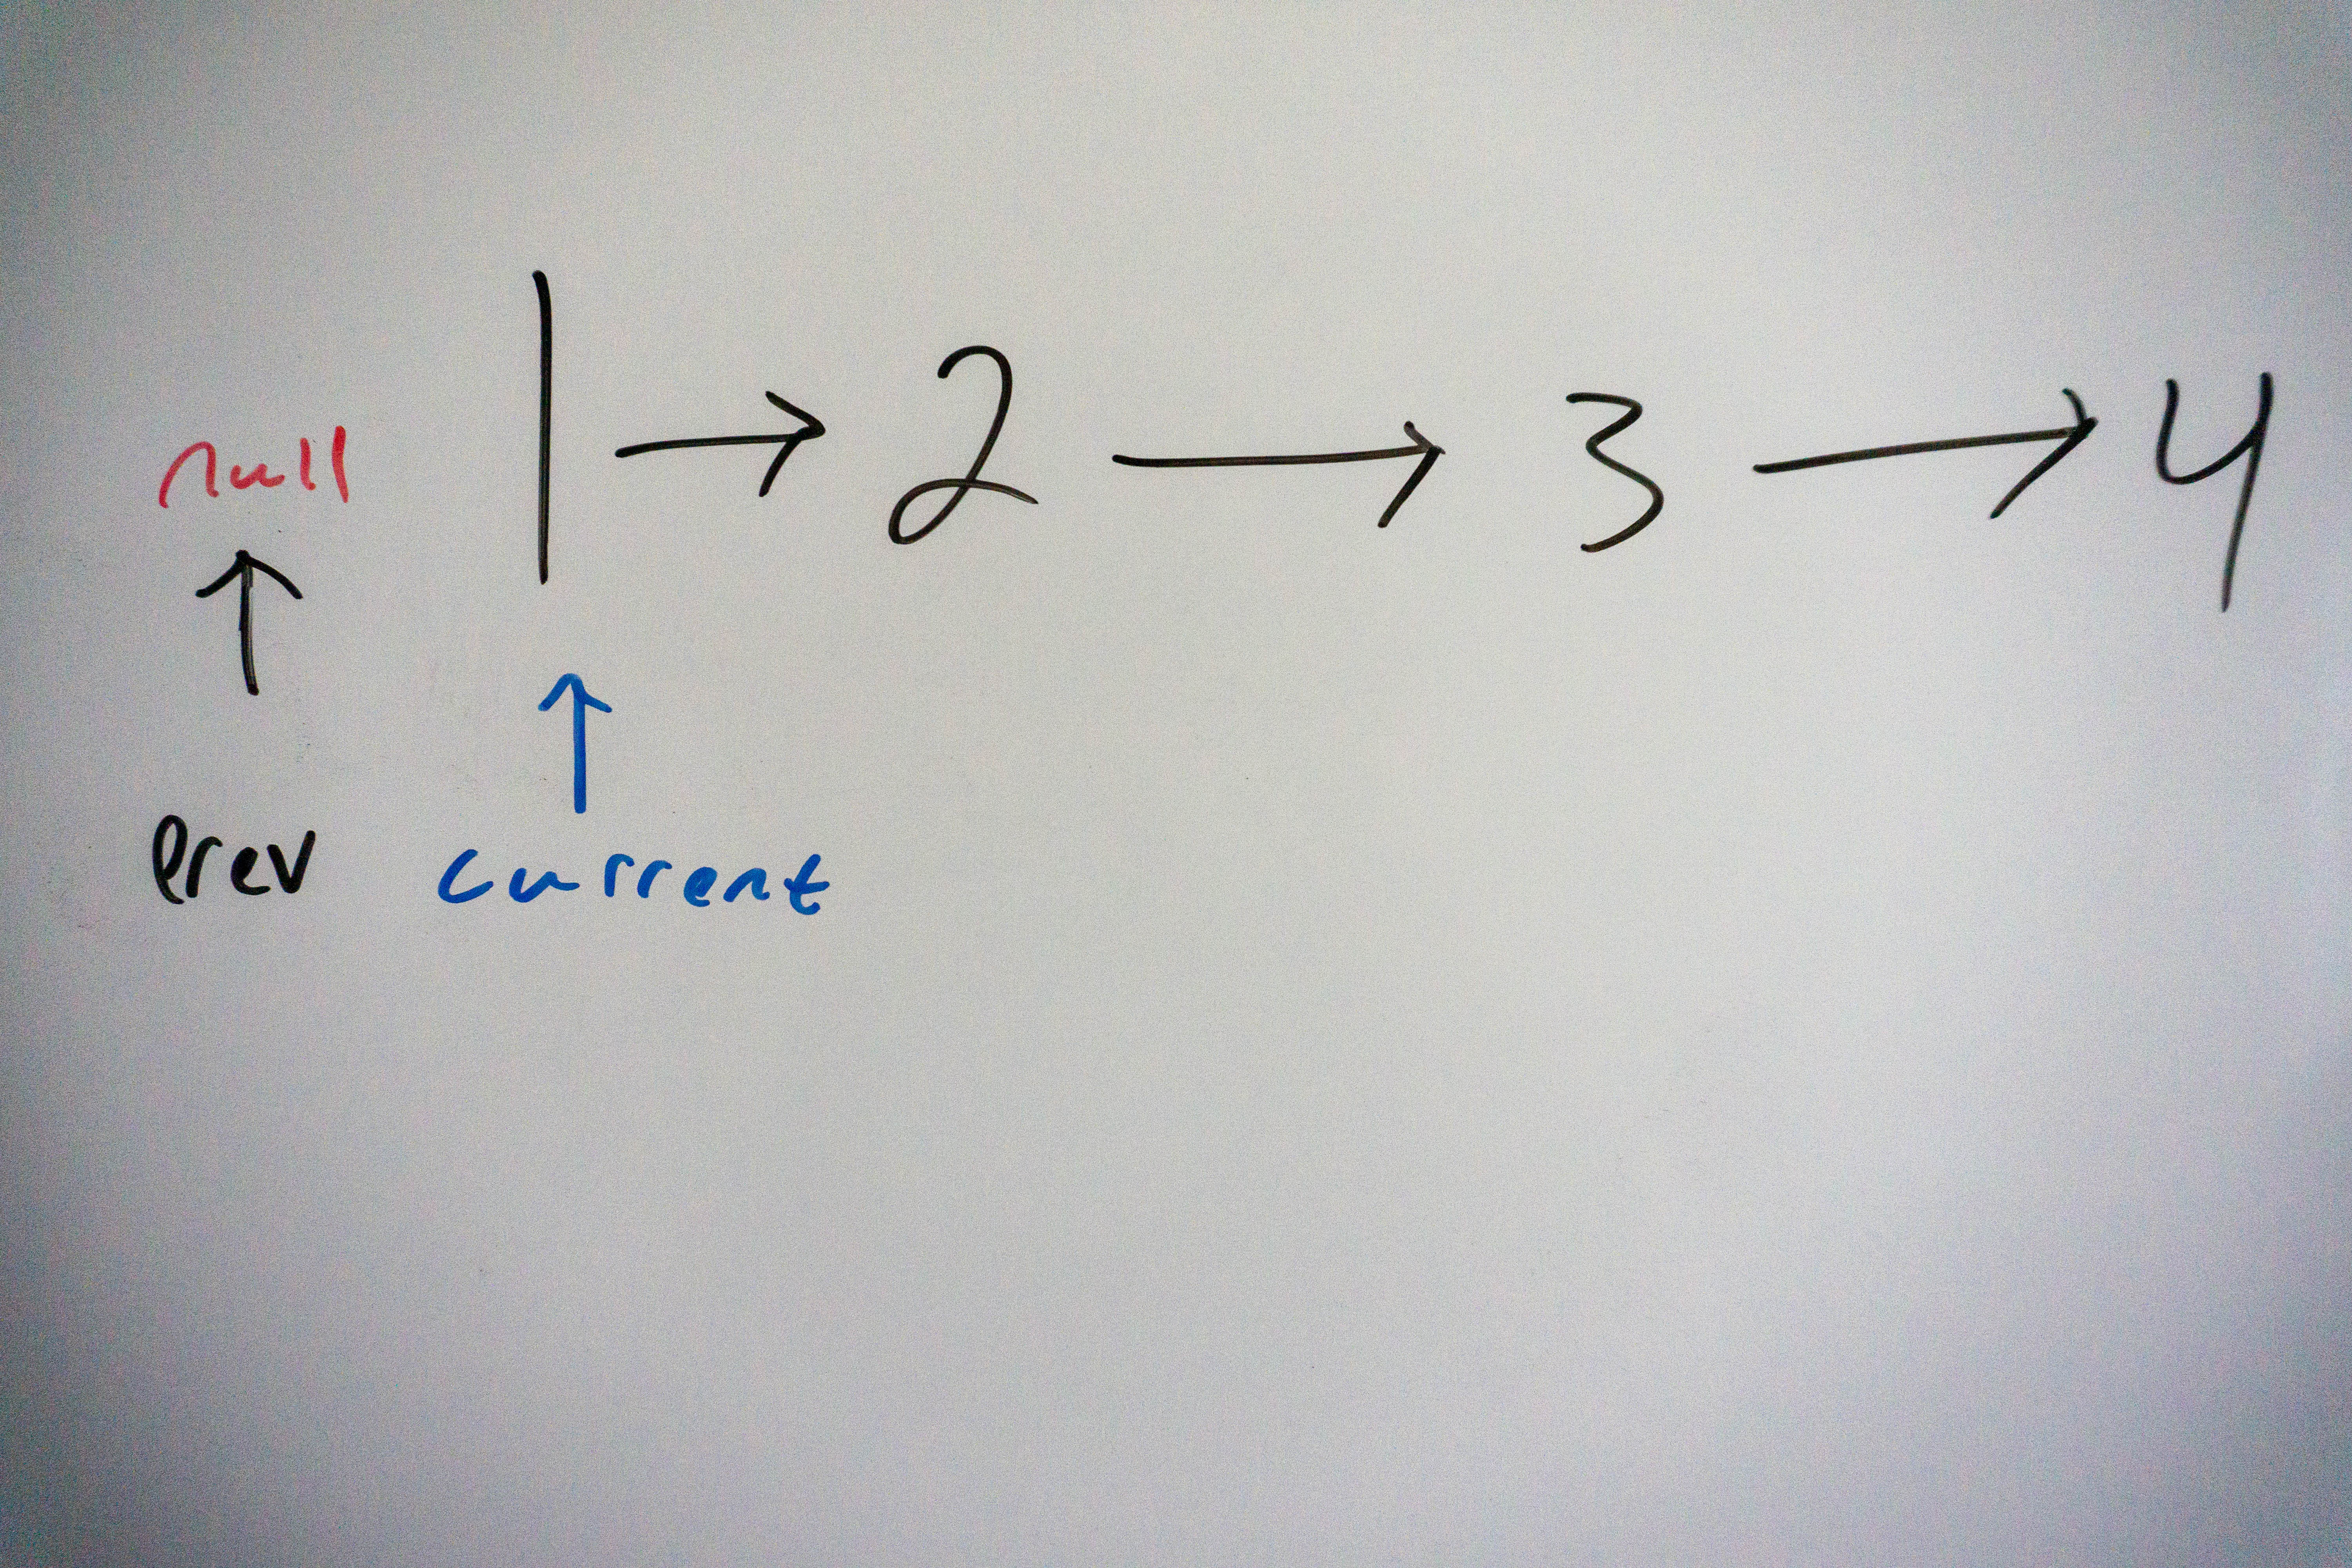 Our function begins with a null pointer to prev and setting the current node to the head.
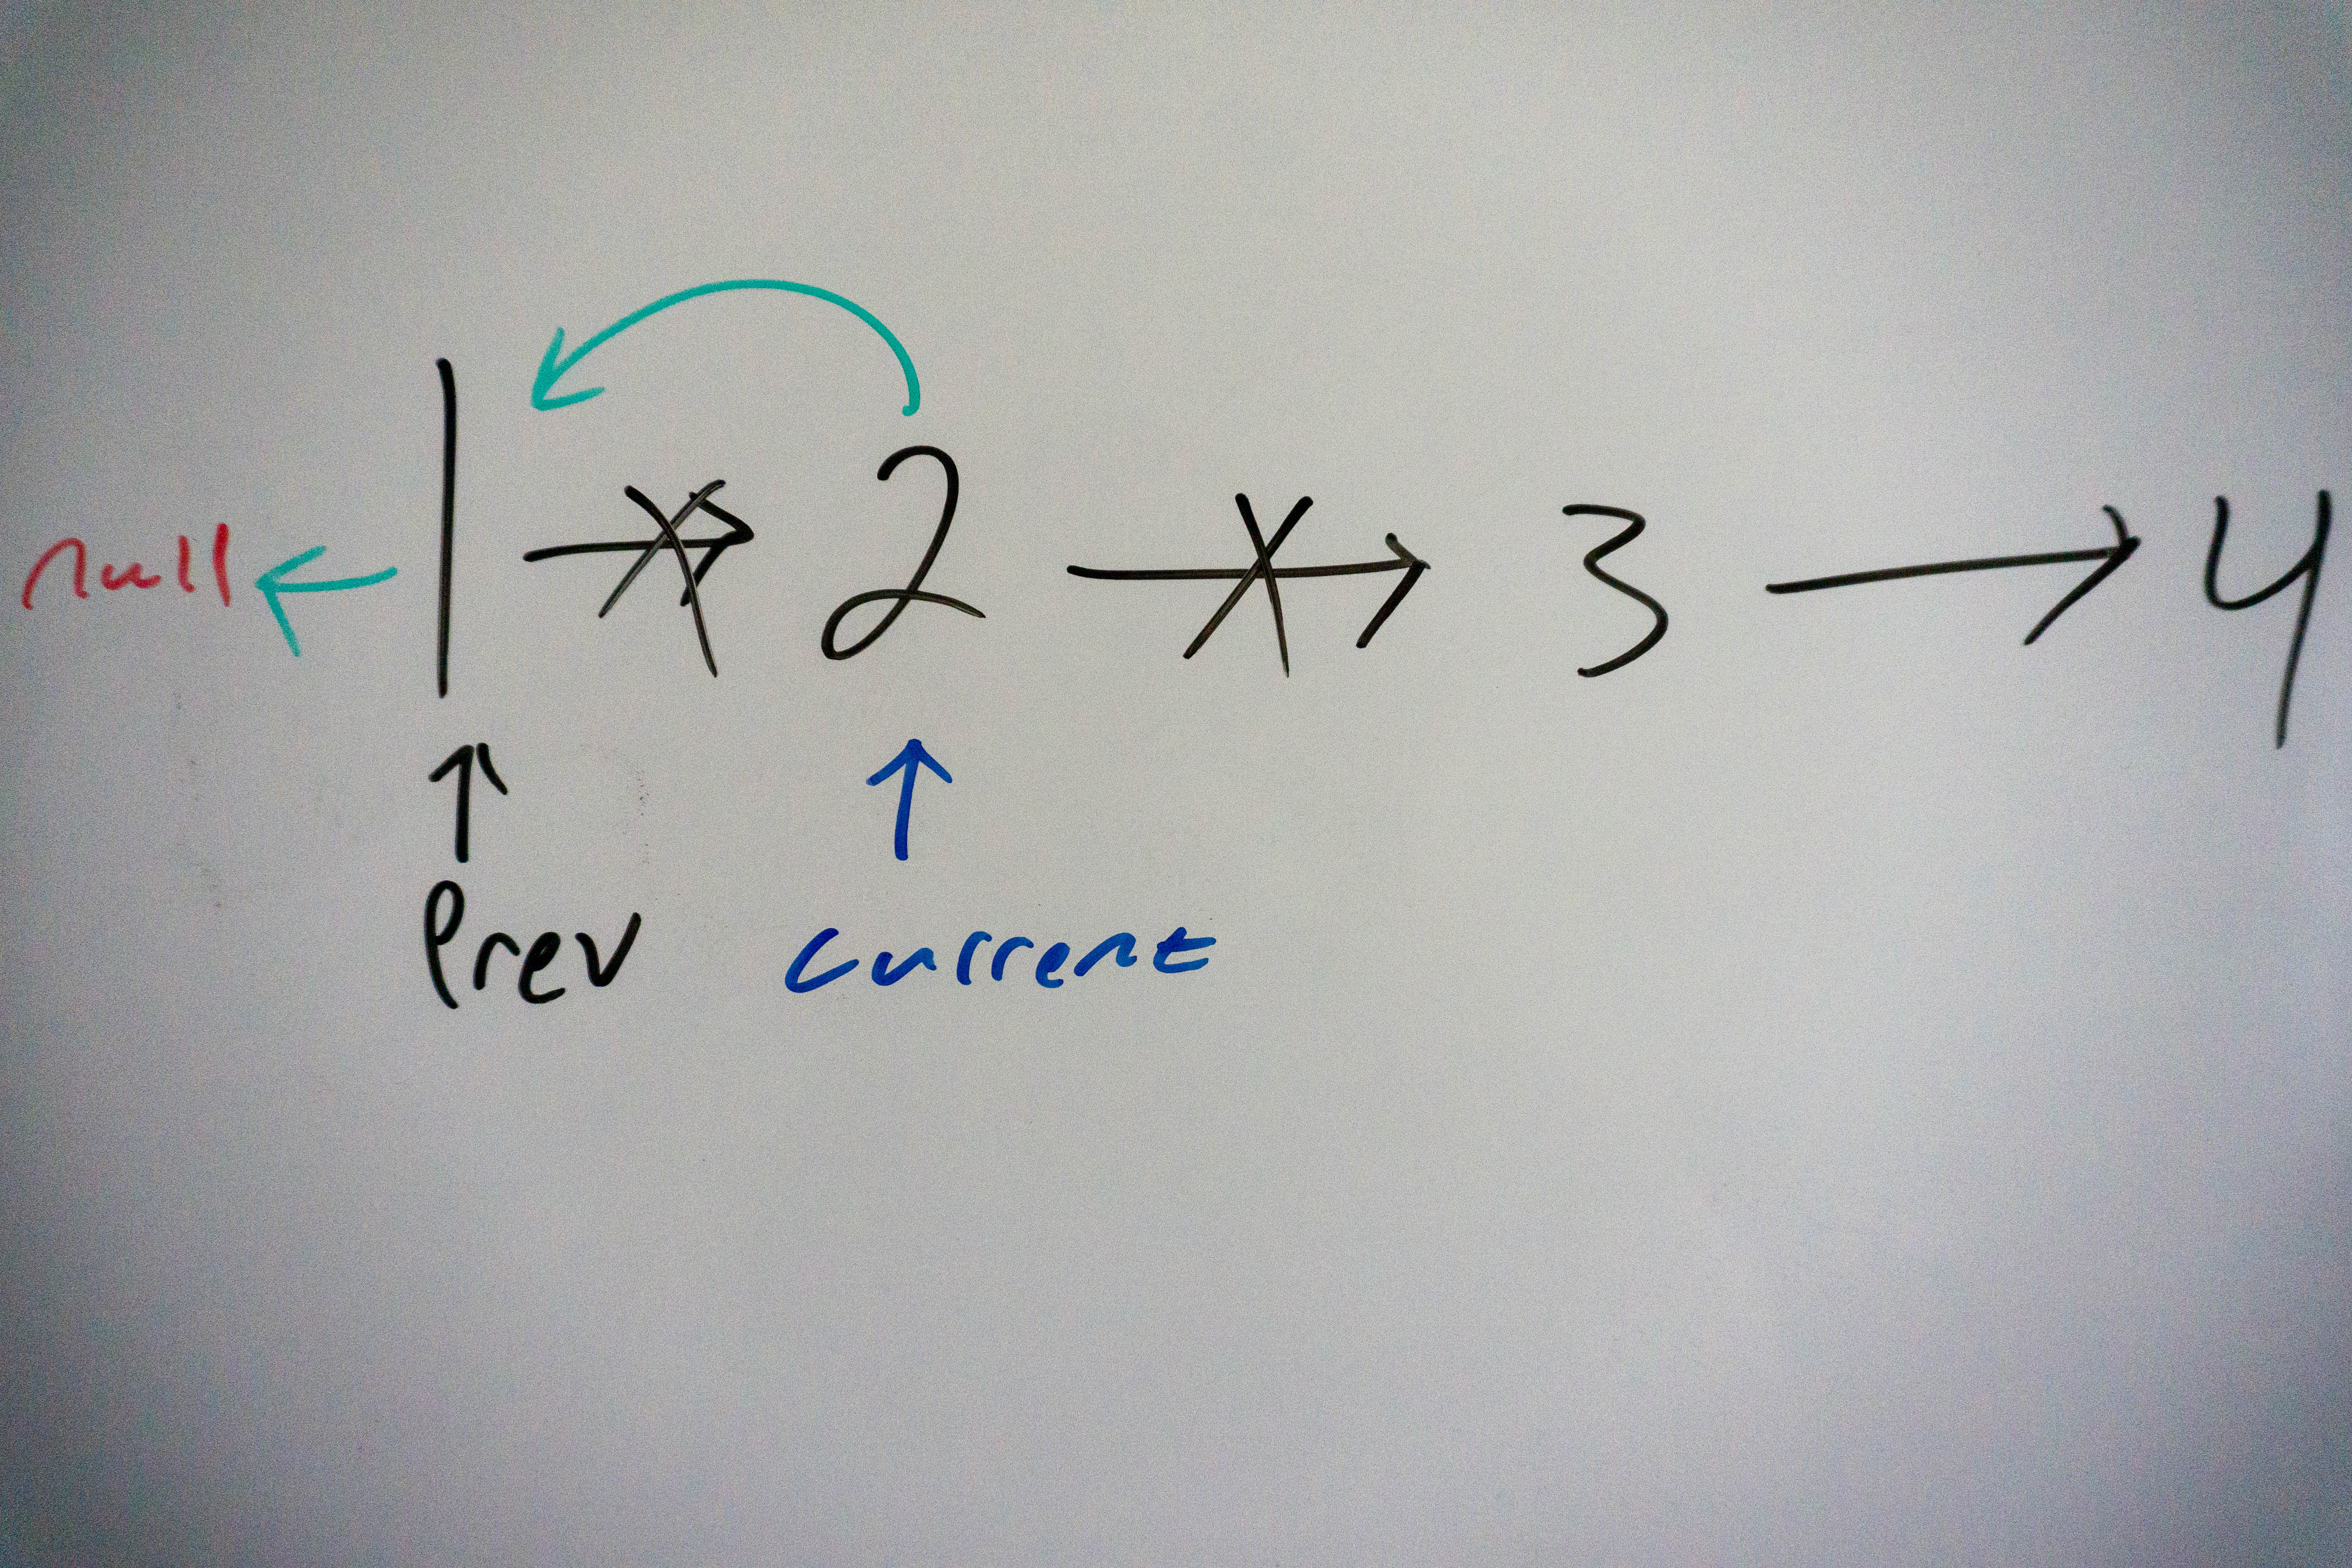 We store the next node in a temporary variable, set the current node’s next pointer to the previous node, and update the current pointer.
 We finish the loop when current is equal to null, we return the prev node reference, which is the start of the reversed list.
Recursive
The recursive solution is not very complicated, it reverses nodes one at a time starting from the last node, moving towards the front of the list.
    public ListNode ReverseList(ListNode head) {
        if(head == null || head.next == null){
            return head;
        }
        ListNode newHead = ReverseList(head.next);
        head.next.next = head;
        head.next = null;
        return newHead;
    }
When the first is first called it will continue recursing until it reaches the tail of the linked list. Upon reaching the tail we return it, the next node to execute will be the node before the tail. It will set the tail’s next pointer to itself, and set its own next pointer to null, also returning the tail as the new head of the list. Each time the recursive function is called, the node in question sets its own next pointer to null, it does not concern itself with updating its own pointer, since that gets taken care of once it exits and moves down the stack.
Both of these methods operate in O(n) time, but the iterative version only requires constant space, whereas the recursive version requires O(n) extra space, which is for storing the call stack.
Reversal of Sublist in Linked List
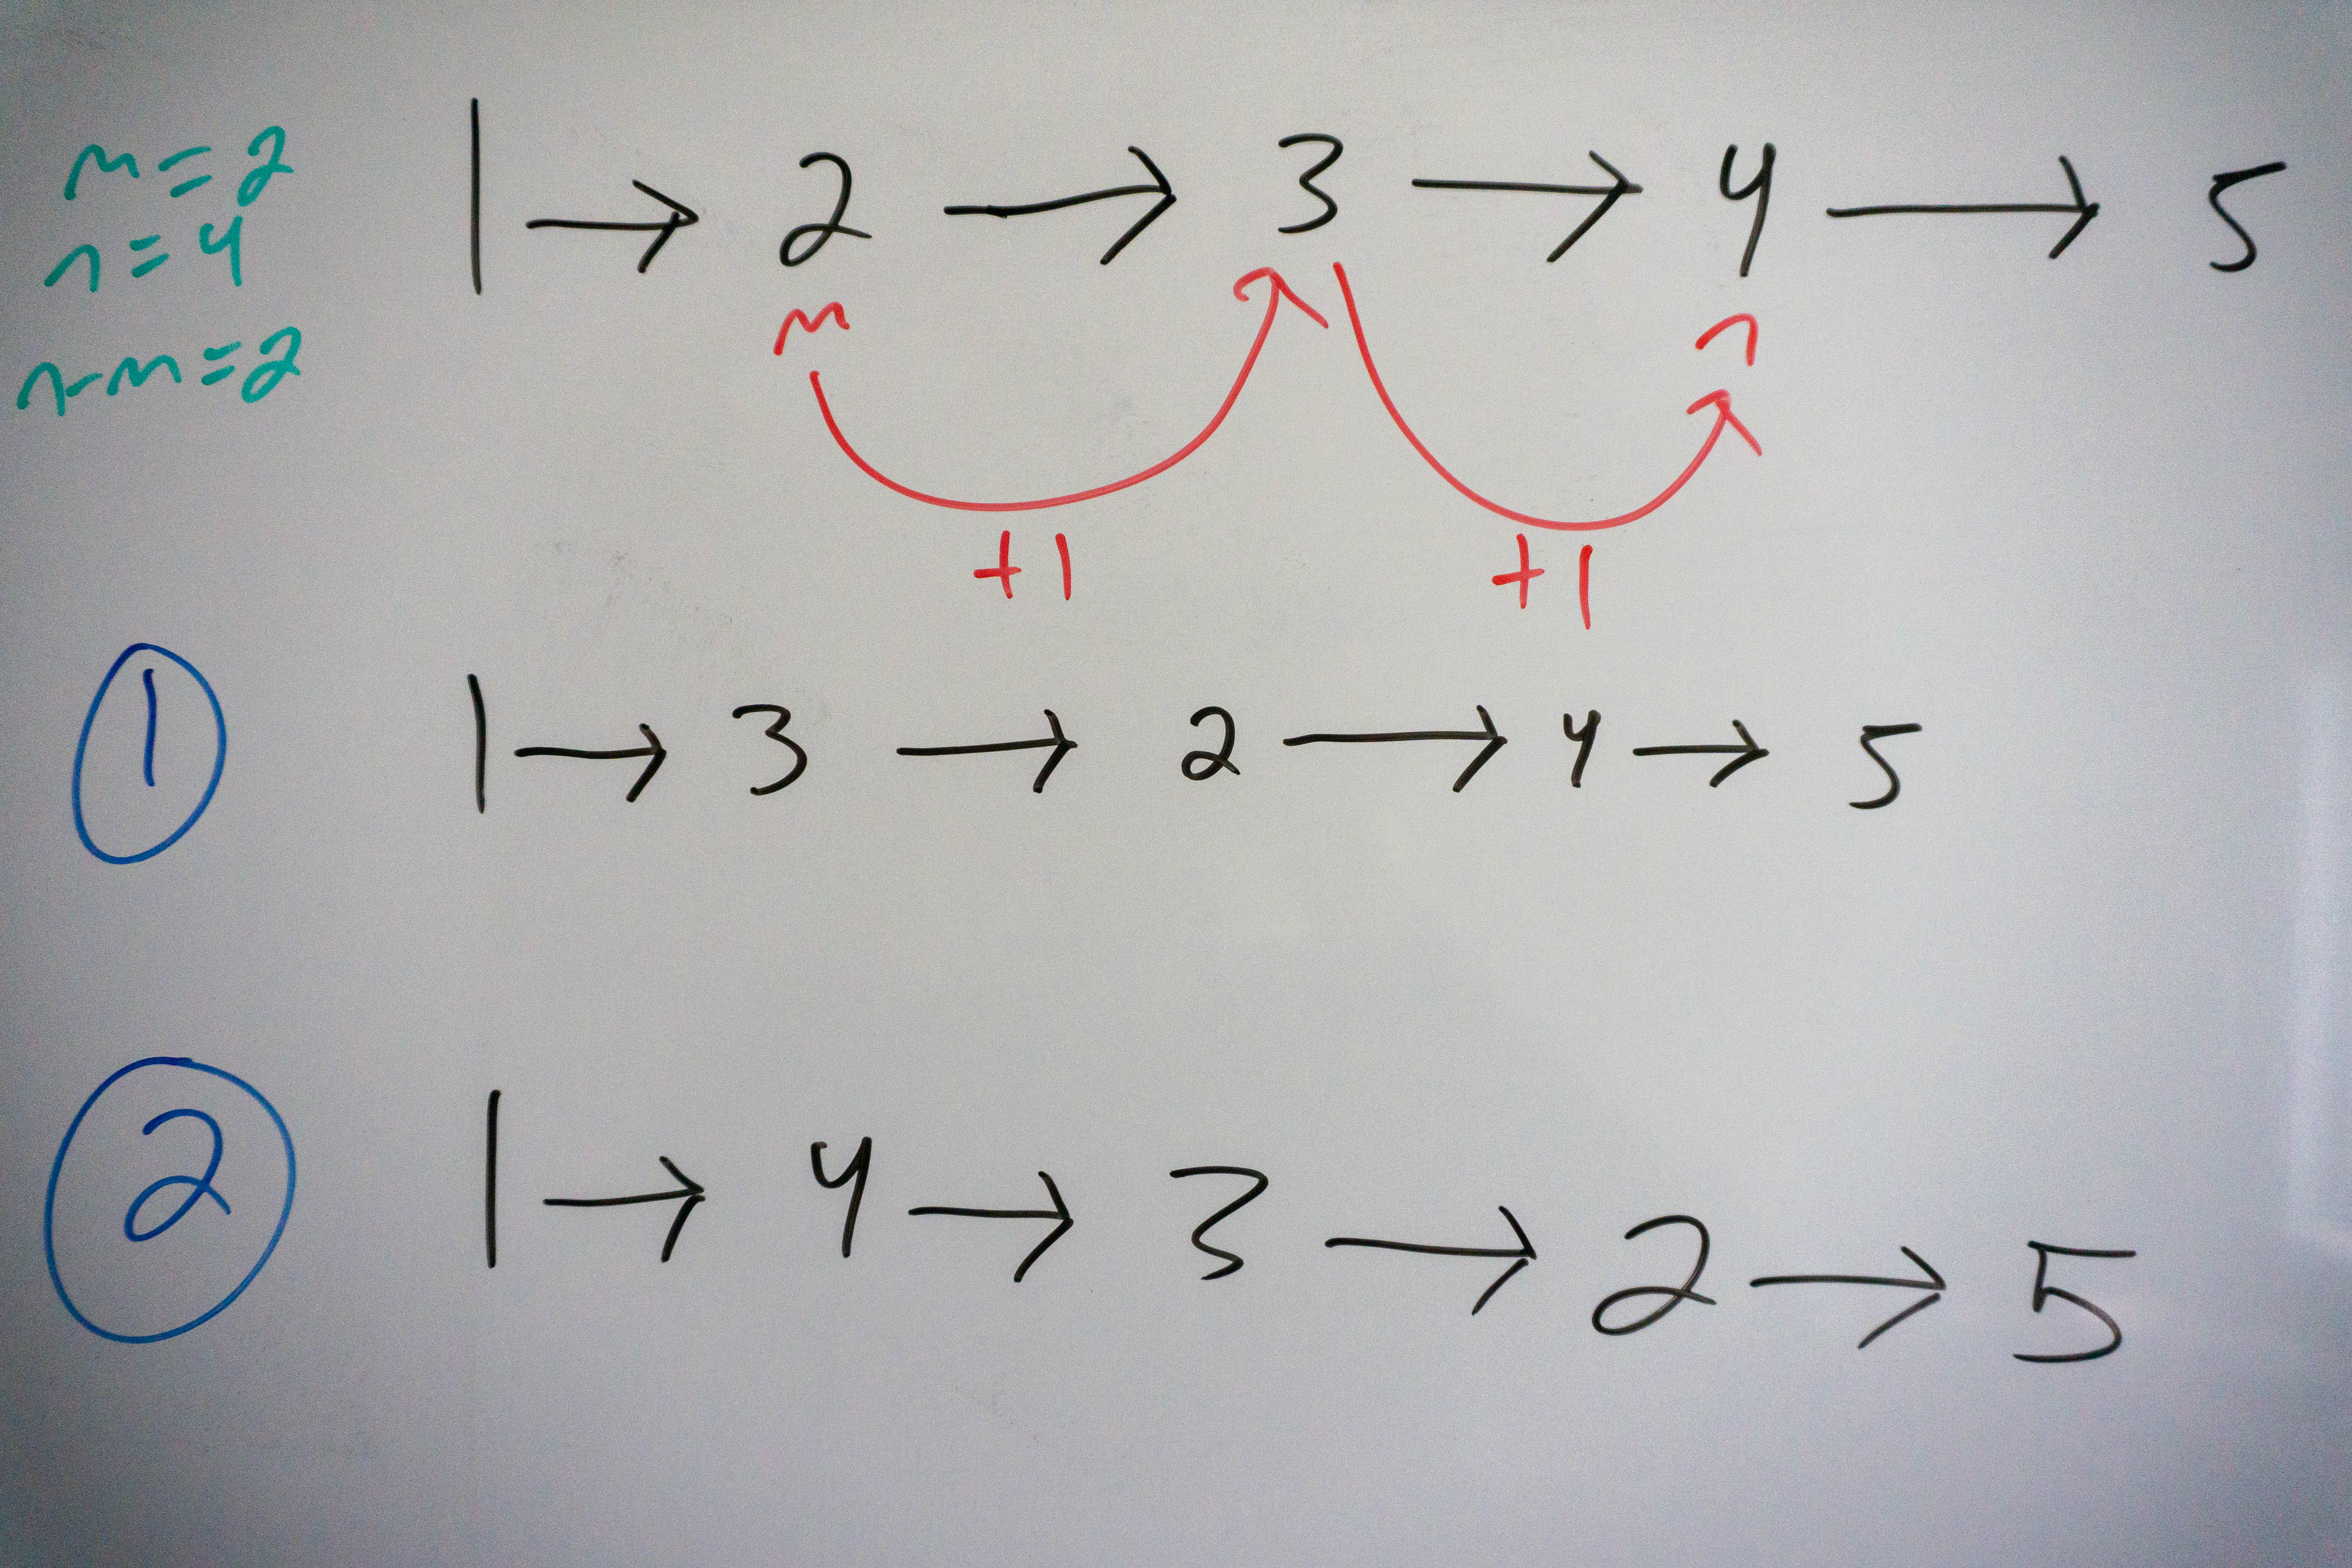
Reversing a linked list is quite trivial once you know how to do it, so now let’s move onto a harder problem: reversing a sublist of nodes within a linked list. Reversing a sublist of a linked list involves a start and end index, m and n, where 1 <= m <= n, that define the range of nodes we want to reverse. We must reverse only the nodes in that sublist, while leaving the rest of the list intact. For example, if the linked list is : 1->2->3->4->5 and we want to reverse nodes 2 through 4, our result would be 1->4->3->2->5. The approach is somewhat similar to reversing the entire linked list, but with a few extra implementation details we need to concern ourselves with. The key idea here is the following: we want to take the front of the sublist and move it towards the back, at each step moving the next item to the front of the sublist. With that in mind, let’s begin.
We start by creating a dummy node, whose next node is the head of the list. We also create a “previous node” which will point to the dummy head. What we want to do now is move the previous node into position, by advancing it until we reach the node before the start of the sublist.
        ListNode dummyHead = new ListNode(0,head);
        ListNode previous =  dummyHead;
        for(int i =0; i < m-1; i++){
            previous = previous.next;
        }
We iterate through 0 to m-1 because our previous node points to the dummy head. Therefore, our dummyHead points to node 0, if we consider the start of the list to be node 1. Each time we add 1 to our current position, so by iterating up to m-1, we iterate to the node before the start of the sublist, which is at position m.
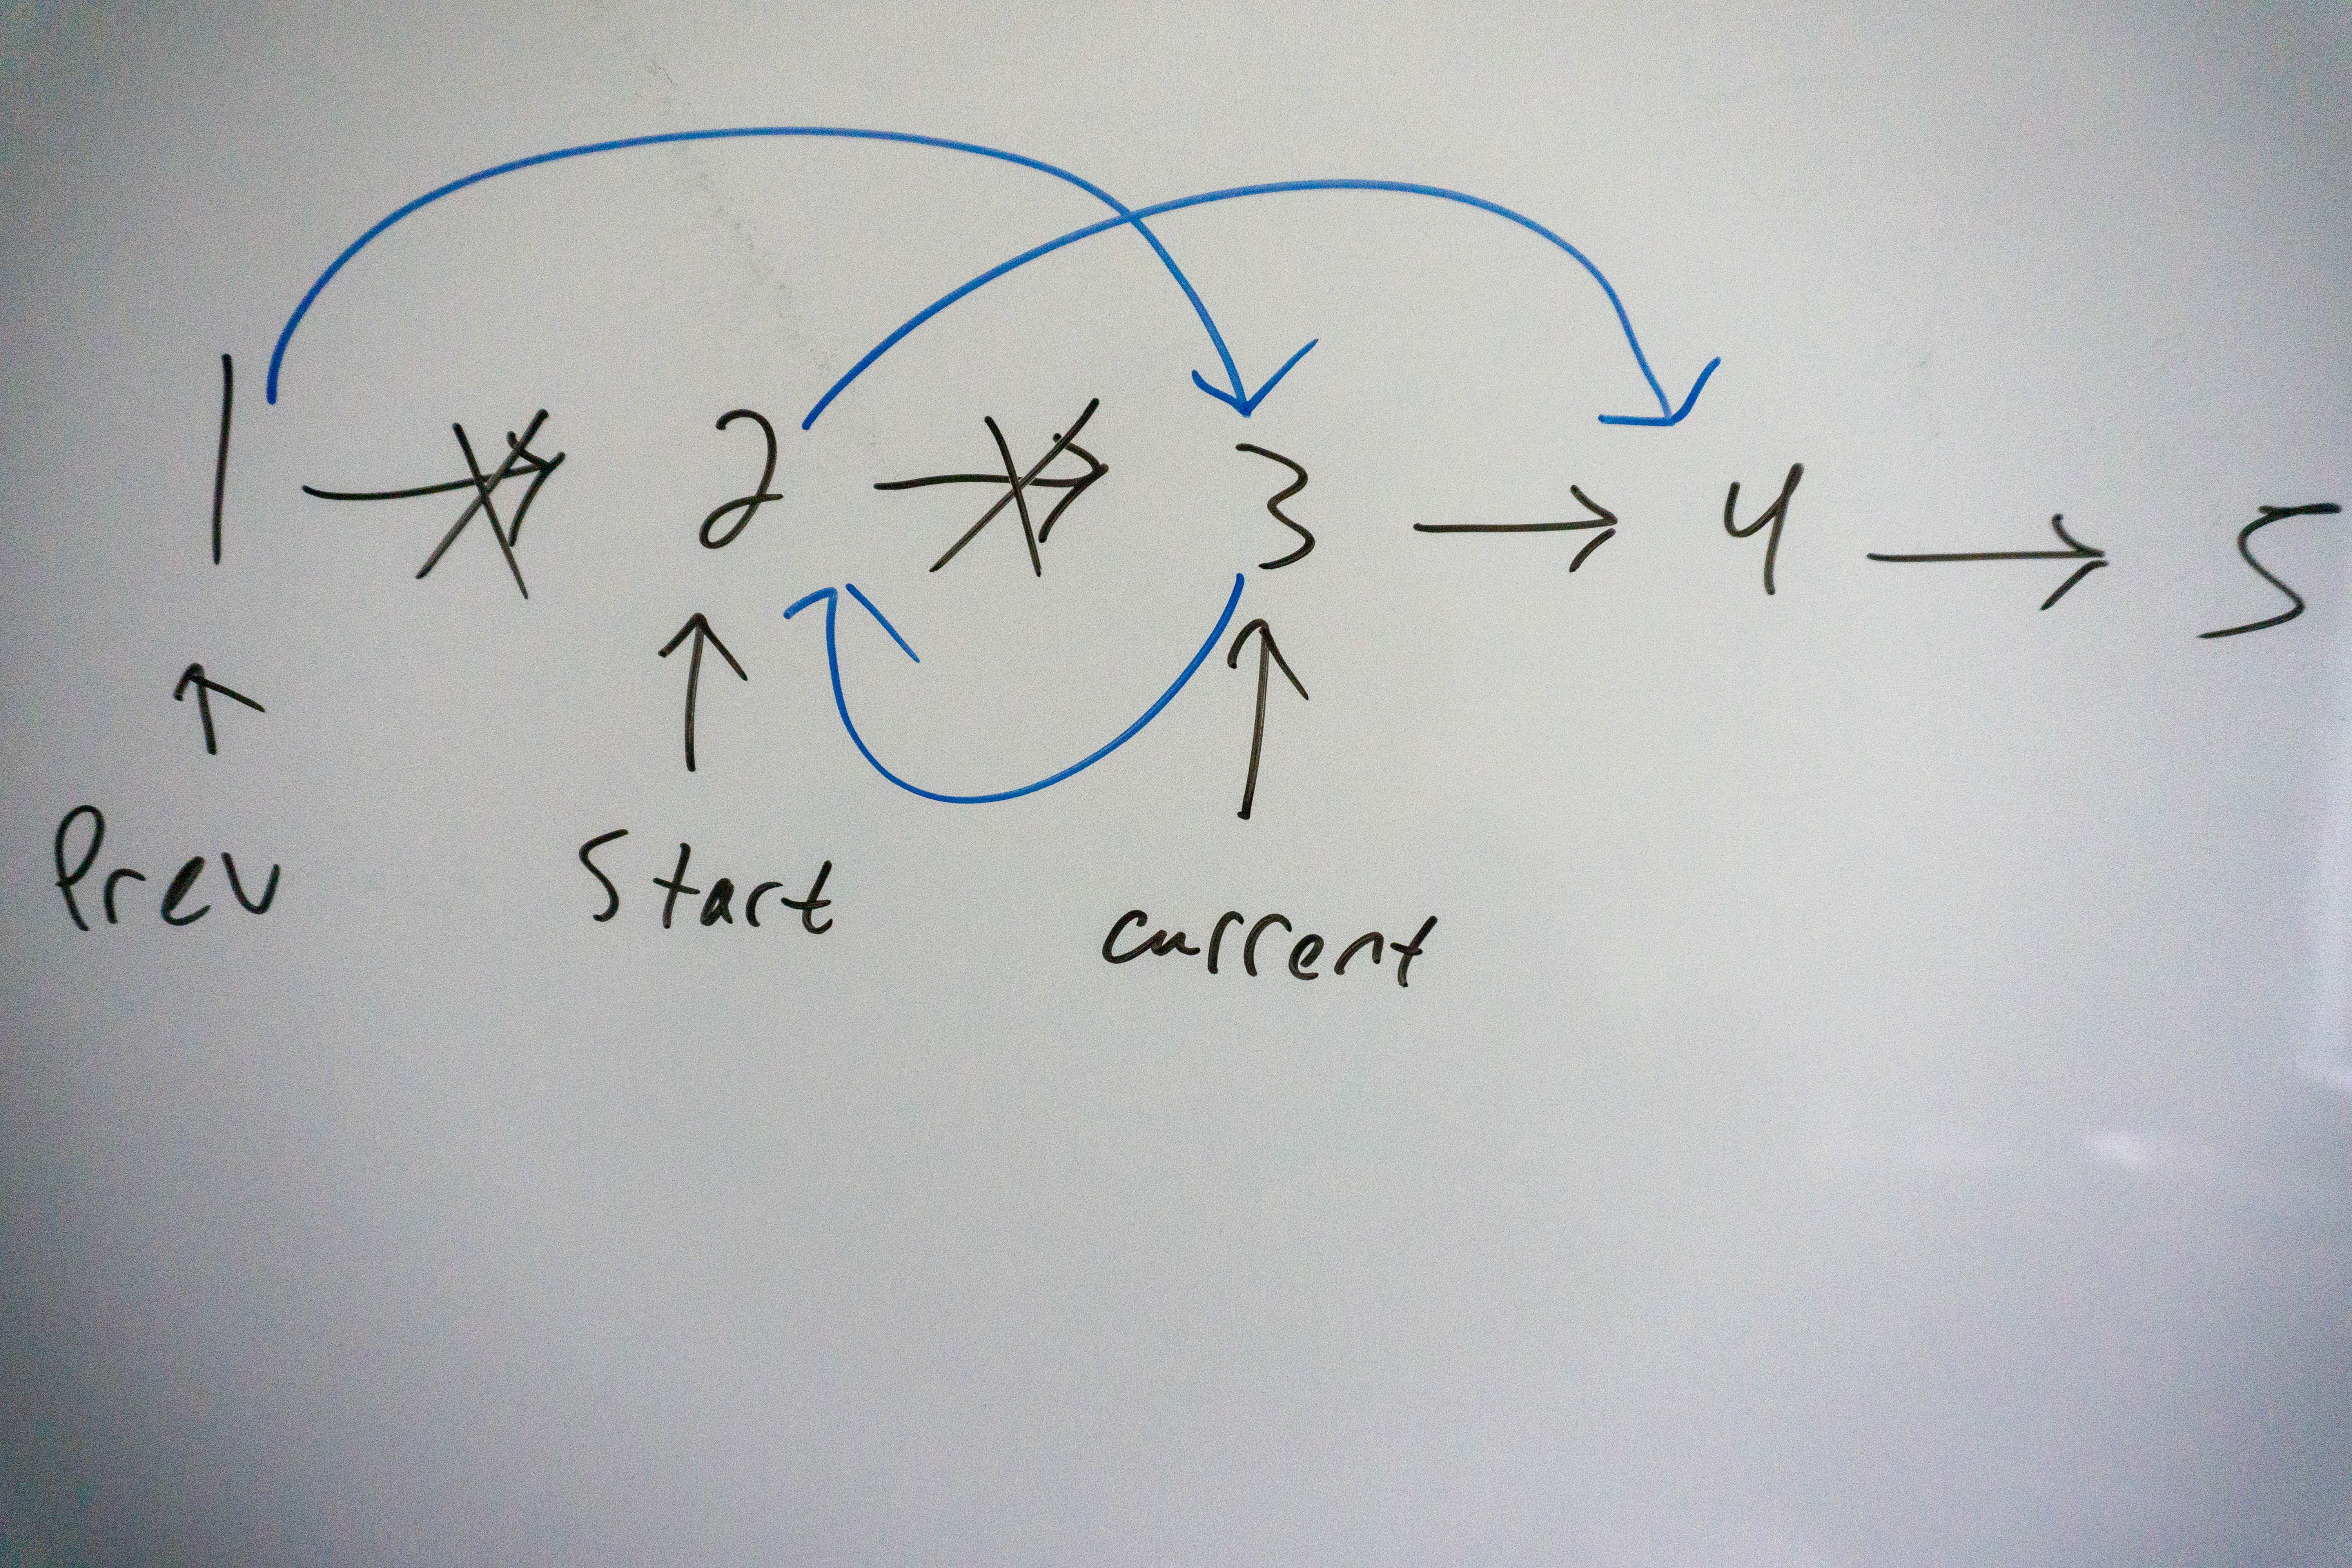
We now need to create two more pointers, the first being a pointer to the start of the list, the second being a pointer to the next item after the start of the list. Now remember the key idea we stated above, we want to do the following:
- Insert the item after the start item to the front of the list
- Update the pointers in the list to reflect the current values
Take a look at this visualization to see what we are trying to accomplish:
The code for doing this is as follows:
        ListNode start = previous.next;
        ListNode current = start.next;
        for(int i = 0; i < n - m; i++){
            //get the node after the current node
            start.next = current.next;

            //insert the current node at the front of the list
            current.next = previous.next;

            previous.next = current;

            //update the current node to be the next node in order
            current = start.next;
        }
        return dummyHead.next;
We return dummyHead.next because dummy head’s next pointer points to the head of the list.
After the first iterations our list looks like so:
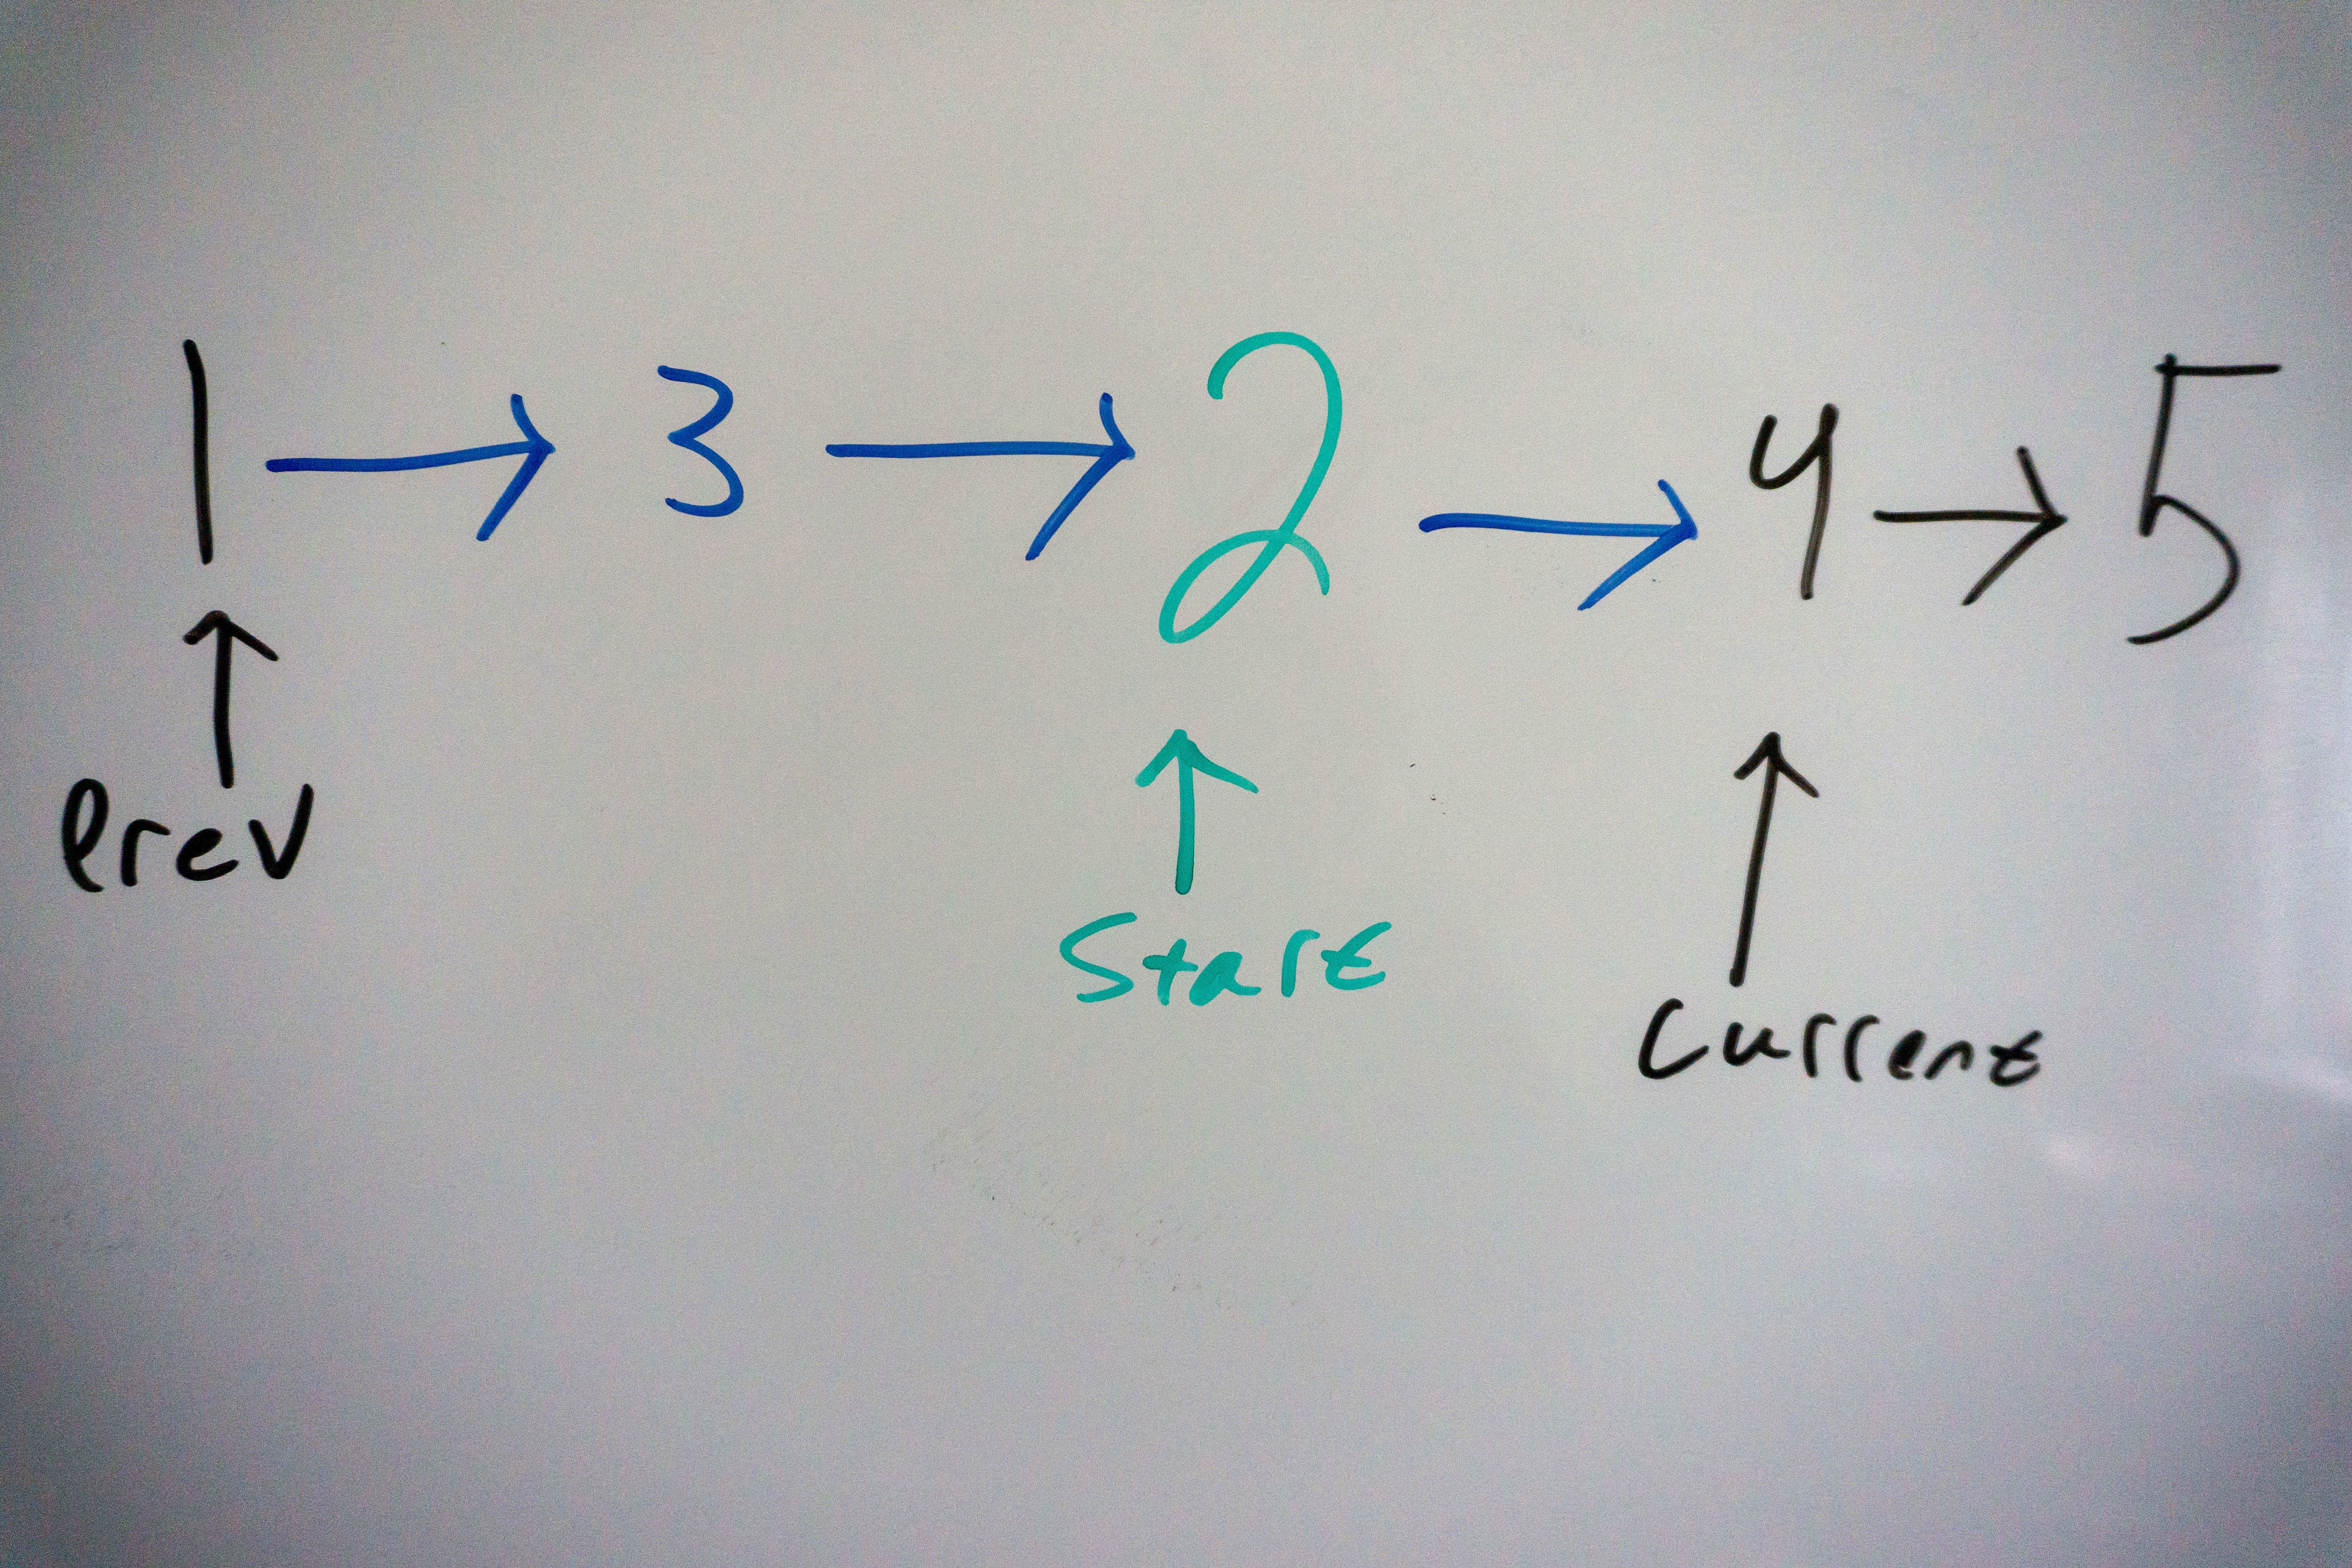
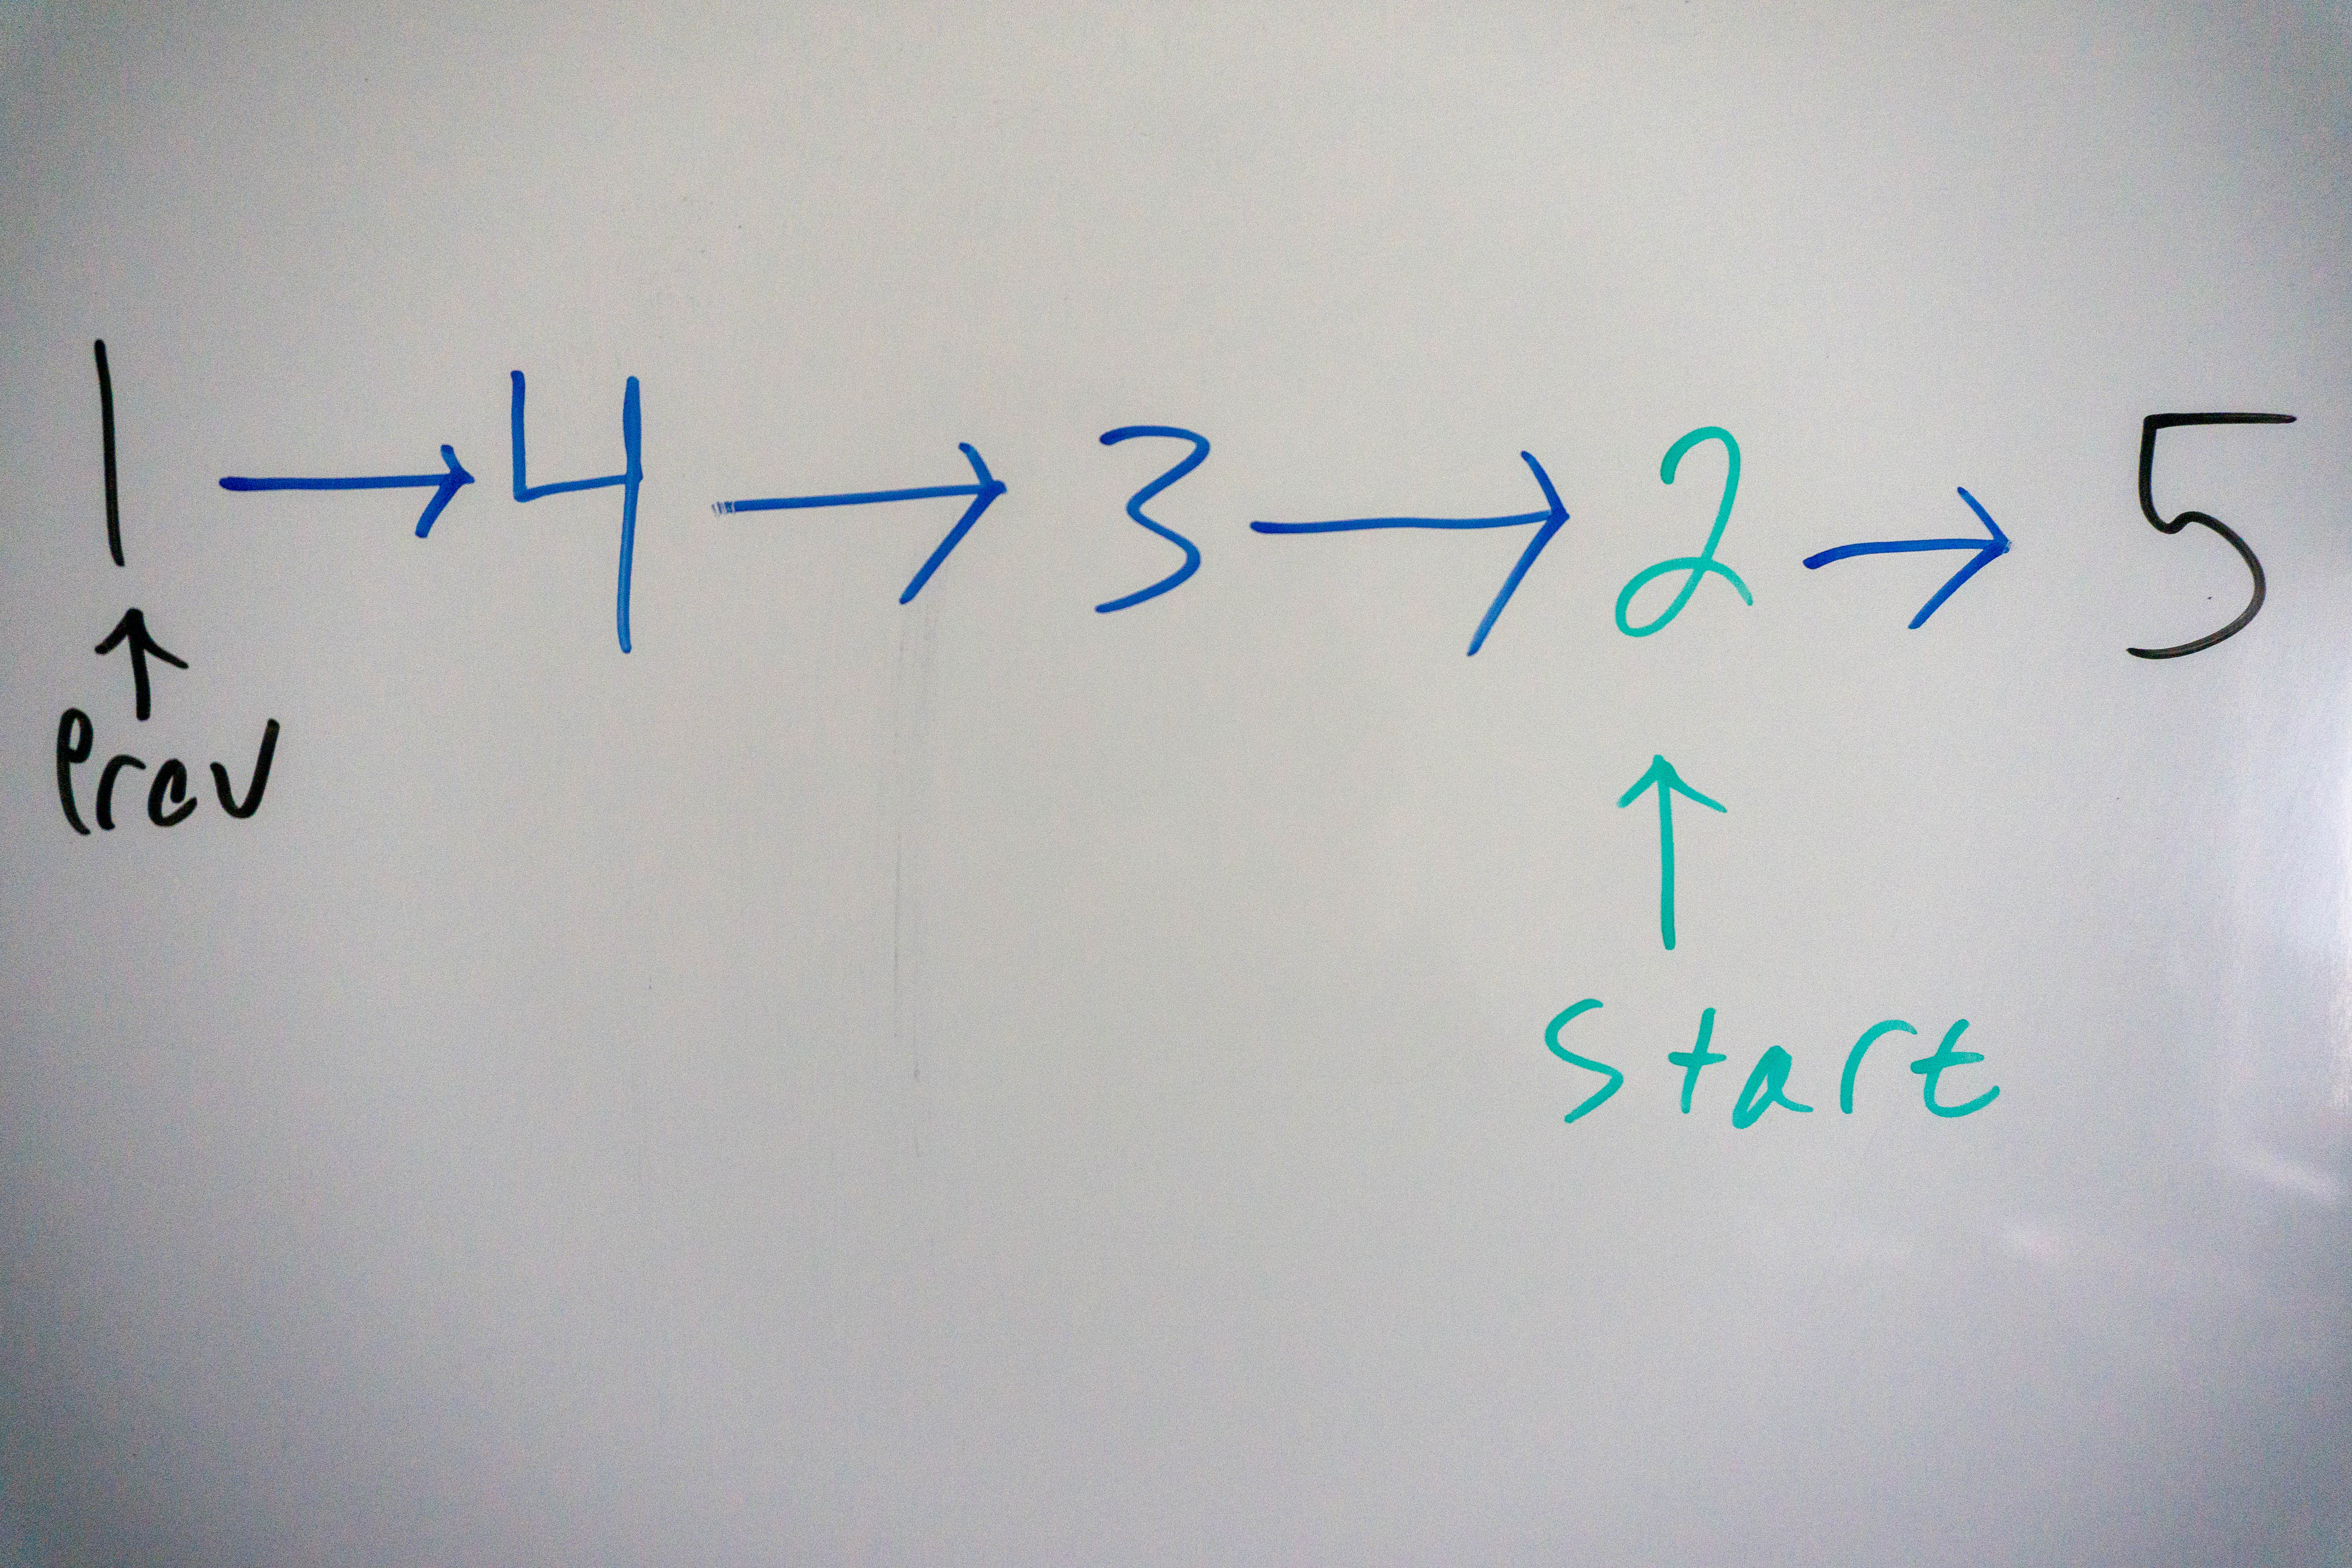
After the second and final iteration we have the following list:
Here is the full code:
    public ListNode ReverseBetween(ListNode head, int m, int n) {
        ListNode dummyHead = new ListNode(0,head);
        ListNode previous =  dummyHead;
        for(int i =0; i < m-1; i++){
            previous = previous.next;
        }
        ListNode start = previous.next;
        ListNode current = start.next;
        for(int i = 0; i < n - m; i++){
            start.next = current.next;

            current.next = previous.next;

            previous.next = current;

            current = start.next;
        }
        return dummyHead.next;
    }
If you are wondering why we loop n - m times in the second for loop it is because we need to move the start item m-n positions to the left, as show here:
After the second and final iteration we have the following list:
Notice how the previous node never changes, that is because we need to maintain the position of the node before the start of the list. Also, when we do start.next = current.next we are taking the node after the current node, or the next node in the sequence after the current node is moved to the front. We are finished when the start node is moved to the end of the list.
Closing Thoughts
When it comes to tackling problems such as the one above the most important thing for me is to be able to explain the problem simply and in my own words. For this problem I say “we start at the node before the start of the sublist, and move each node from their position to the start of the sublist, going from left to right. We need to update the start node to the next node in the sequence before we can proceed.” As long as I remember those two sentences I can figure this problem out, and other problem that involves sublist manipulation. I encourage you to formulate a sentence or two that helps you remember the problem at hand. This technique of talking through problems will serve you well, and not just in programming. As always, stay on the lookout for more posts and have a good day!